Showing posts with label Thanksgiving. Show all posts

Starch-free Gravy (AIP) & Thanksgiving Recap


Well, we not only survived our first AIP/Paleo Thanksgiving, but completely thrived on it too. I know it is sort of weird to write about Thanksgiving recipes after the fact, but I’m going to do it anyway in the hopes that maybe it can be inspiration for upcoming Christmas & holiday meals (or for next year’s Thanksgiving).

So much of AIP involves making other healing lifestyle choices, other than just changing the food a person eats. Reducing stress, getting adequate rest/sleep, and gentle exercise are all also key components in promoting healing. The holiday season can be stressful & I didn’t want that potential stress (and lack of sleep/exercise) to derail all the hard work I’ve already done. We decided to celebrate at our own home knowing that cooking for ourselves would give us the greatest control over our food ingredients (and reduce the risk of cross contamination.

Since this Thanksgiving was my first on AIP, or paleo, I wanted to make it seem as “normal” as possible, including items similar to our traditional Thanksgiving favorites. But I also knew the importance of keeping things as simple as possible & not overdoing it.  We planned to eat a hearty, late-morning Thanksgiving brunch & then an early dinner. Having the main meal later in the day didn’t require us to get up at the crack of dawn to start cooking & gave us more time to prepare things. Here’s what our menu looked like. Note: I have reintroduced green beans, eggs in small quantities, as well as a few nut varieties, like pecans. Other than those reintroductions, everything else is AIP.


Brunch Menu
  • Squash Pancakes (Paleo, included whole eggs)
  • Bacon (AIP, check ingredients) 
  • Grapefruit (AIP) 

Thanksgiving Dinner
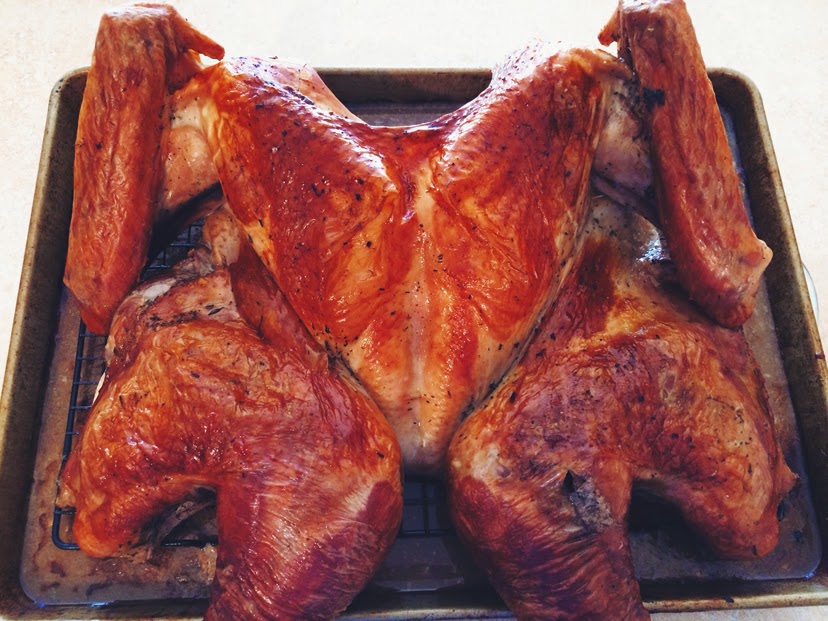
  • Dry Brined, Butterflied Turkey with herbs (AIP)
  • Starch-free Gravy (AIP) 
  • Mashed White Sweet potatoes (could be topped either with gravy, or with a few chopped honey-candied pecans to mimic Paleo sweet potato casserole)
  • Roasted Green Beans with fried shallots (AIP Reintroduction)
  • Braised Collards (AIP)
  • Cranberry Sauce (AIP) 
  • Carrots & Pickles (AIP, check ingredients in pickles) 
  • Pumpkin Pot de Creme with coconut whipped cream (Paleo, contained egg yolks)
  • Pumpkin Pie (for Husband, not paleo or AIP, served on paper plates to reduce risk of gluten cross contamination) 
On Tuesday, I made the cranberry sauce, roasted the green beans, and roasted & mashed the sweet potatoes. All those items went into the fridge & could be reheated, where necessary, right before eating. Husband also butterflied the turkey on Tuesday, saving the turkey backbone, neck & giblets for homemade stock making. I then rubbed the butterflied with kosher salt and a mixture of thyme, rosemary & sage. We let the bird dry brine in the fridge until Thanksgiving. On Wednesday night, I started cooking the turkey stock & made husband’s pumpkin pie.


On Thursday, after brunch, we candied pecans for the mock sweet potato casserole, assembled & baked the pumpkin pot de cremes, fried the shallots for the green beans, roasted the turkey (which took only two hours for our 20lb + bird, because it was butterflied) with a basting liquid of bacon drippings/homemade turkey stock/white wine(the alcohol completely cooks off in the oven), braised the collards, reheated the beans & mashed sweet potatoes, whipped coconut cream, and made gravy. Yes, we still worked a good amount on actual Thanksgiving, but it wasn’t frantic work & we weren’t exhausted by the time we actually ate.

Having so much leftover food has been one of my favorite parts of Thanksgiving! We’ve eaten either reheated actual leftovers or repurposed leftovers for many meals since Thursday! And I still have a few ideas for the leftover Turkey that has been frozen too. I’m starting to think of preparing Thanksgiving as the ultimate batch cooking session :) Knowing that we would be eating Thanksgiving leftovers for future meals helped us to restrain our portions on actual Thanksgiving & keep us from doing the traditional overeating. Though, everything was SO tasty that it was hard to keep from getting extra portions :)


The one dish I was very concerned about missing from our AIP/Paleo feast was mashed potatoes, which are usually my favorite side dish of any holiday meal. Once we topped our mashed sweet potatoes with the starch-free turkey gravy, they tasted SO good that I didn’t even miss the regular mashed potatoes. I do highly recommend mashing white sweet potatoes instead of the orange or purple ones because the white ones tend to be a little less sweet & a little more like regular potatoes. The gravy topping was also key. I’ve thickened gravy & fruit sauces with arrow root starch, but I had also never made gravy without any starch. Cooking onions & shallots with turkey drippings, homemade stock, a little white wine (don’t worry, the alcohol boils away), and herbs, then pureeing the whole mixture made for the most fantastic gravy.

I often find myself wishing that Thanksgiving didn’t come only once a year, not just for the food, though it is some of my very favorites, but also for the spirit of gratitude and thankfulness that permeates the season. I am thankful for the Autoimmune Protocol & Paleo. I am so very thankful for better health this year, especially when I compare it to how awful I felt at this time last year. I am thankful for a husband & family & friends who support me on this healing journey. And yes, I do want to repeat this exact menu for Christmas Eve dinner too :)


Starch Free Turkey Gravy

4 Tbl (80 g) Turkey Drippings (we basted our dry brined turkey with 2 oz bacon grease, plus 1 cup Sauvignon Blanc & 1 c homemade Turkey Stock)
1 large shallot, minced (approximately 1/2 c or 55 g)
1 small onion, minced (approximately 1 1/2 c or 195 g)
1/2 c Sauvignon Blanc
1 c Homemade Turkey Stock, unsalted
1 tsp fresh Thyme leaves
1/2 tsp Sage, minced
Sea salt, as needed

  1. Saute the shallot & onion in the turkey drippings over medium heat until translucent.
  2. Add the wine & turkey stock. Bring to a boil & cook until the liquid reduces by half.
  3. Puree the liquid with an immersion blender (or in a high speed blender). Taste and adjust seasonings as necessary, adding additional sea salt if necessary.
  4. Serve immediately or store cooled leftovers in the refrigerator.

Note: if you did not baste your turkey with bacon/wine/stock as I did, and your drippings are not as flavorful, you may wish to add some bacon grease and/or a little additional wine/herbs to the liquid before reducing the liquid.

Pumpkin Panna Cotta Tart with Gingersnap Macaroon Crust (AIP)


Pumpkin pie, specifically my great grandma’s recipe, is the most quintessential Thanksgiving food in my opinion. But creating an AIP version of her pumpkin pie has been a bigger challenge than I anticipated (and has involved multiple failed attempts). Once I combined Great Grandma’s pumpkin pie flavor profile with her gingersnap cookie flavor profile, I finally came close to something that tasted like the “normal” holidays.


This holiday season is my first time navigating major holidays while following the Autoimmune Protocol.  I’m very much into tradition, especially when it comes to holidays & holiday foods. Coming to terms with the realization that not every dish I try to recreate AIP-style will taste (or look) exactly like it’s original can be really a challenge.


Also, can I just say that grain free, dairy free, refined sugar free, egg free, nut free baking is really hard? I’m still very much learning how new-to-me ingredients act during the scientific processes involved in baking. My multiple attempts at a traditional pie crust  turned AIP were unsuccessful, but repurposing my AIP Coconut Macaroon recipe into a crust worked really well. And to make it taste a bit more holiday-esque, I substituted a bit of the honey for molasses & added some ground ginger. Trying to create a custard-like pudding without the aid of eggs steered me towards the panna cotta side of things. Both the crust and the filling could be made & enjoyed separately, but I really enjoy them together. It might not taste exactly like “normal” pumpkin pie, but it’s still a flavorful treat that won’t derail healing processes.


Speaking of the holiday season, a group of AIP bloggers have put together a free holiday guide full of AIP-friendly holiday recipes. And Phoenix Helix has a great podcast about surviving the holiday season. If you need some inspiration, check those out. Have a wonderful Thanksgiving!


Pumpkin Panna Cotta Tart with Gingersnap Macaroon Crust
Yields 8 servings

Gingersnap Macaroon Crust 
120 g (1 1/2 c) Shredded, Unsweetened Coconut
7 g (1 Tbl) Coconut Flour
1 tsp Ground Ginger
Pinch of Sea Salt
26 g (2 Tbl) Coconut Oil, melted
65 g (3 Tbl) Honey (local or organic is best)
21 g (1 Tbl) Unsulphured Molasses
  1. Preheat the oven to 350 F.
  2. Pulse the shredded coconut, coconut flour, ground ginger and sea salt in a food processor until combined.
  3. Add the oil, honey and molasses & pulse until well mixed.
  4. Press the mixture into a 4" x 14" Rectangular Tart Pan
  5. Bake for 10 minutes in the preheated oven. Rotate the pan & bake for 10 additional minutes, or until the tart crust has turned a bit more golden, but is not scorched. 
  6. Cool completely. Remove the tart pan & place the crust onto a baking sheet. Proceed with the panna cotta filling.

Pumpkin Panna Cotta Filling 
4 g (approximately 1 tsp) Grassfed Gelatin
123 g (1/2 c) Organic Pumpkin
20 g (3 Tbl) Grade B Maple Syrup
2 tsp Vanilla Extract (optional for AIP)
Coconut Whipped Cream, for serving 
  1. Place the coconut milk into a small sauce pan. Sprinkle the gelatin over the coconut milk & mix gently--I usually use my fingers & break up any clumps that I can.  Set aside & allow the gelatin to bloom for 10 minutes. 
  2. Add the remaining ingredients. Heat over medium heat for five minutes, whisking constantly. 
  3. Pour into the prepared crust (note, you may not need all the filling; place any leftovers into a small ramekin-type vessel). Refrigerate at least 3 hours before serving. The tart may be made a day in advance.
  4. Cut the tart into diagonal slices. Serve with coconut whipped cream

This post contains affiliate links. Thanks for supporting Sweet Treats. 

Cinnamon Chip Scones (GF)


No matter whether it was Thanksgiving, Christmas or Easter, I grew up with the tradition of having a special holiday breakfast.  My mom would make an egg casserole (which we called “egg bake” in the upper midwest) and cinnamon rolls, and there would also be fruit & juice. Mom would set the table with a festive tablecloth, the crystal juice glasses that otherwise lived in the china cabinet, sometimes the fine china, but always with holiday napkins. After my dad said the blessing, we would clink glasses, toast to whatever holiday it happened to be, and then, of course, eat!


With my insatiable sweet tooth, my personal favorite part was the Pillsbury cinnamon rolls that Mom would bake in a round cake pan. As most siblings do, my sisters and I would all try to vie for the middle roll which usually had the most frosting. I still have a particular fondness, even to this day, for freshly baked Pillsbury cinnamon rolls.


As a somewhat newly married couple, my husband and I are still developing our own traditions. One of the the traditions I’m trying to pass into our “micro-family” is the holiday breakfast concept. Of course there are a few adaptations my husband and I like to make (coffee is a must and sometimes we mix a little bubbly with the juice), but I still dearly wish to include my beloved cinnamon rolls.  Once I started living mostly gluten free, though, suddenly the options changed.  There are very few gluten free options in our small-ish town, unless you want to make things yourself.


I’ve done a fair amount of gluten free baking & cooking these days, but yeasted products still are a bit of a mystery to me. I’m well versed in how bread flour works in artisan breads & I just haven’t mastered how to mimic those items in gluten free versions. Last weekend, I attempted to adapt a cinnamon roll recipe to be gluten free, but the results were not good. The texture was all off & so was the flavor.... I guess it may take a lot more testing before I am confident in adapted gluten filled yeast products to be gluten free.


Luckily, scones ARE easily adapted to be gluten free.  This particular cinnamon chip variation tastes surprisingly a lot like my favorite pillsbury cinnamon rolls.  I added a bit of leftover pumpkin puree to the dough.  Rather than tasting “pumpkin-y,” the puree just adds a bit of extra moisture & helps deepen the complexity of the flavors.  Once the glaze is added they became a perfect substitution--in fact, I couldn’t stop eating my test batch! I had to put the leftovers in the freezer to curb myself.  Since scones fit in the non-yeasted “quickbread” category of baking, they don’t require rising time! I love recipes that save time during busy holidays. These scones absolutely will be making an appearance on this year’s Thanksgiving brunch table.


I hope that wherever you are this Thanksgiving and holiday season, you are able to spend time laughing and giving thanks with friends & family, and that you take time to make & eat good food. Perhaps you can start your own holiday breakfast tradition.


Cinnamon Chip Scones (GF) 
yields 12 to 16 scones, depending on the size

Scones
4 oz / 1 stick Unsalted butter, cold
2/3 c Whole Milk + 1 tsp Lemon Juice (or substitute Buttermilk )
8.5 oz / 2 c Jeanne’s Gluten Free AP Flour Mix (or substitute regular AP flour, if not gluten free) {LINK} 
1.85 oz / 1/4 c Brown Sugar
1/2 tsp Baking Soda
2 tsp Baking Powder
1/2 tsp Salt
1 tsp Cinnamon
120 g / 1/2 c Cinnamon Chips
122 g / 1/2 c Pumpkin Puree 
Tapioca Starch, for dusting

Glaze
Confectioners’ Sugar
Milk 

  1. Grate the cold butter, using the large grate part of a box grater, onto a piece of plastic wrap or parchment paper. Place the grated butter into the freezer while measuring & preparing the remaining ingredients. If not using buttermilk, mix the whole milk with the lemon juice & let stand at room temp. 
  2. Measure the remaining ingredients. Preheat the oven to 400 F. Line 2 baking sheets with parchment paper & set aside. 
  3. In a large bowl, whisk together the flour, sugar, soda, powder, salt & cinnamon.  Add the frozen butter pieces & toss quickly with your hands to combine.  Break up any large clumps.  Add the cinnamon chips & briefly toss to combine. 
  4. In a liquid measuring cup, whisk together the buttermilk with the pumpkin puree. Add the liquid to the dry ingredients & quickly mix with your hands until the dry ingredients are just incorporated. Be careful not to overwork the dough or let the heat from your hands melt all the butter.  
  5. Dust the clean counter or board with additional tapioca starch (or AP flour, if not gluten free).  Pat the dough out, adding tapioca starch on top of the dough & onto your hands, until the dough is approximately an inch tall.  Use a small round cutter (or any shape you like) to cut out scones.  Place the cut scones onto the prepared baking sheets. Carefully gather the scraps & re-pat them out, repeating the process until the dough is all used.  (Note: re-rolling works well with the gluten free dough, but if regular flour is used, the re-rolled scones may be a bit tougher.) Alternately, you can use a large cookie scoop to make drop scones by scooping the scone dough out of the bowl & portioning it directly onto the sheet pan. 
  6. Use a try pastry brush to brush off any excess tapioca starch.  Bake both pans in the preheated oven for 15 minutes, rotating the pans & swapping the top and bottom pans halfway through.  The scones are done when they are lightly brown & the cinnamon chips begin to caramelize.  
  7. Remove the pans from the oven & allow to cool slightly while the glaze is made.    
  8. In a separate bowl, sift a little confectioners’ sugar to remove any lumps. Add a splash of milk & whisk until combined. Adjust the amount of milk & confectioners sugar until you achieve a thick glaze. Either stripe the glaze across the slightly warm scones, using either a cornet paper piping bag, a zip-top bag with a corner cut off, or a pastry bag.  Alternately, dip the slightly warm scones into the glaze.  Allow the glaze to set & serve. 
  9. Store any leftover scones at room temperature in a covered container for up to 2 days, or freeze for longer.  

Note: As far as cinnamon chips go, I usually use Hershey’s brand.  However, they can be a bit difficult to find sometimes...   In some areas, like I discovered in South Carolina, they are only available during the holiday season, so I recommend stocking up.  Or, King Arthur has they available to order from their website (as does Amazon. ).  

This post contains affiliate links.

Pecan Pie (GF)


Sometimes, we do not fully realize a person’s influence on us until they are no longer with us. Case in point, my friend Chef John Michael Lerma, who sadly, at the age of 52, passed away earlier this month.


John Michael, or JML as he is often referred to, was a native of my home state of North Dakota & also attended my alma mater, the University of North Dakota, though in the past years, he resided in the Twin Cities area of Minnesota.  In addition to being a noted food writer, cookbook author, and competitor in culinary competitions, he also taught in various demonstration kitchens, was a representative for Emile Henry bakeware, and he lead culinary vacations (!!) to both Italy & Mexico.


While I was working at the University of North Dakota Wellness Center, both in the marketing department and as an instructor for the Culinary Corner Demo Kitchen, John Michael did several guest demonstrations. He also cooked for us demo kitchen employees a few times & just talked to us about life and experiences.  He had such a big heart & truly loved food (and people). I was so saddened to hear of his passing.


When I met John Michael, I was in an interesting place in life... I knew I would be moving to South Carolina the following year to fulfill my dream of attending culinary school, but I didn’t really know what life would bring beyond that. Having also earned an art degree in graphic design/photography and also having worked in a marketing department, I really appreciated an atmosphere of collaboration & helping your fellow artists become the best they could be. But it seemed to me as though kitchens were often more competitive than collaborative. John Michael really embodied the spirit of collaboration I found was lacking in many kitchens. It was easy to tell from conversations with him one-on-one and from seeing him teach a room full of eager pie fans how excited he was about sharing his knowledge with others. He genuinely cared about his audience & wanted them to be as successful as possible in their kitchen endeavors. He was genuine, not at all afraid to reveal his own tricks & tips.


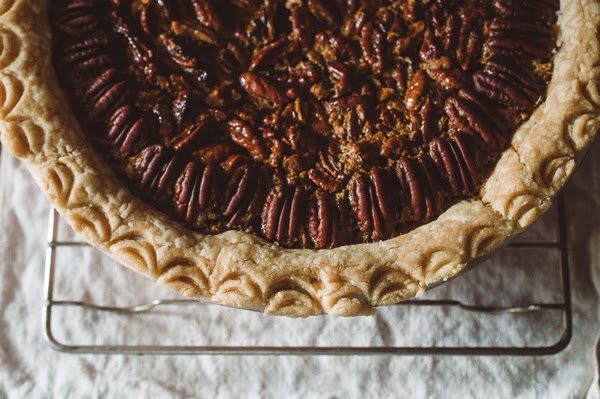
John Michael was famous for many food items (I still love to make his pizza dough & this amazing creamed mushroom dish I saw him demo once), but pies were one of his specialties.  He won seven (!) national pie competitions & his second cookbook is entirely pie themed.  I thought the best tribute to him was to make a pie in his memory. And to make that pie in the pink Emile Henry pie dish he graciously gave to me (and autographed) on one of his visits.  With Thanksgiving around the corner, making his pecan pie recipe, adapted to be gluten free, seemed the most appropriate.


In preparation to make this pie & write this post, I reflected on my experiences with John Michael Lerma. I like to think that perhaps his genuine, caring manner has influenced my own style, both when I was teaching in a culinary classroom, and now as I “teach” through blogging. I hope that I can portray even a fraction of his passion for food & for others. I will also forever remember him as the person who introduced me to the wonderful world of Vanilla Bean Paste(which truly is one of my favorite baking ingredients).


John Michael, you will be missed!  But your legacy will live on in your cookbooks & in the many lives you touched!

Pecan Pie (GF) 
adapted from Garden County Pie
yields 8 servings 

1 recipe GF Pate Brisee 
tapioca starch for dusting 

FILLING
4 large eggs, room temperature, well beaten
5.25 oz / 3/4 c Granulated Sugar
2.65 / 1/3 c melted unsalted butter
3.65 oz / 1/3 c pure maple syrup (NOT pancake syrup)
5.5 oz / 1/2 c light corn syrup
5.5 oz / 1/2 c dark corn syrup )i only had 4 oz, so i added an additional 1.5 oz of light) 
2 tsp vanilla bean paste
1 tsp Bourbon (optional) 
1/4 tsp sea salt
1 1/2 c pecans, broken, plus additional for decorating the top of the pie (for me it was 3.9 oz +2 oz inside) 

Whipped Cream for serving, optional 
  1. Make the pie dough & allow it to rest in the refrigerator at least 2 hours (overnight is even better. 
  2. When ready to assemble the pie, remove the dough from the refrigerator & place it on a surface that has been well dusted with tapioca starch. Dust the top of the dough & the rolling pin with additional tapioca starch.  
  3. Quickly roll out the dough, keeping it as circular as possible, until it is a little larger than a 9” pie pan.  Move the dough around on the counter/board to make sure it isn’t sticking.  
  4. Gently fold the dough in half & place it into the center of the pie pan.  Unfold the dough & press it lightly with your finger tips & knuckles until it is formed to the pan.  Use a knife or kitchen sheers to cut off any excess.  Place the pan into the refrigerator while the rest of the filling is made.
  5. Preheat the oven to 375 F. 
  6. In a large bowl, whisk together the eggs, granulated sugar, melted butter, pure maple syrup, corn syrups, vanilla bean paste, bourbon and sea salt. Add the pecans & stir to combine.
  7. Remove the prepared crust from the refrigerator & set on top of a rimmed sheet pan. Optional, use the edges of a spoon to make the scalloped pattern by gently rolling the tip of the spoon (I used an ice tea spoon) over the edge of the dough. Add a divot inside each scallop.  
  8. Pour the prepared filling into the crust.  Place additional pecan halves around the edge of the pie, if desired.
  9. Bake for 20 minutes at 375 F, then reduce the oven to 350 and bake for an additional 40 to 50 minutes.  Check the pie often in the end stages & cover the edges of the pie with foil if they become too dark.  When the pie is done, the edges should be set & the center will be just a little wobbly.
  10. Remove the pie from the oven & allow to cool completely. Refrigerate, if possible, a couple hours before serving--this will make cutting the pie easier. 
  11. Cut into pieces & serve with whipped cream, if desired. The crust will be very crumbly, but delicious. Leftovers can be stored room temperature in a covered container, but the pie is easier to cut and serve when refrigerated. 
This post contains affiliate links. 

GF Pear Galette with Ginger Creme Anglaise

To continue my “Week in the [Project] Life”series for Project Life 365, today’s prompt is #dessert.  For background on this project, please read my previous #breakfast#lunch, and #dinner posts. You can find me on Instagram @lauravein and Project Life 365 at @projectlife365.

#dessert: Pear Galette with Ginger Creme Anglais & Vanilla Bean Ice Cream. 
Crust adapted to be #gluten_free. 

We’re just over two weeks away from American Thanksgiving, a holiday that almost requires one to have pie for dessert. If you’re planning on making pie for Thanksgiving, now would be a wonderful time to get a head start on the crust.


Make the dough now & freeze it until you plan to assemble & bake the pies (for me, that would be until Wednesday, November 27th) That way, life might be a little more simple the week of Thanksgiving. Even if you were not planning on making a pie for Thanksgiving, I urge you to give it a chance this year, especially if you follow a gluten free lifestyle. 


I know, I know, making pies can be a scary thing, both to the novice & seasoned baker. Usually it’s the crust that gives people the most bother. But pie shouldn’t be scary!  Crafting a pie is not nearly as difficult as you may think (or imagine). And if you start practicing now, there’s more than enough time for a couple of trial pies before the big days.


Galettes are a fancy name for a free-form pie--the easiest of pies! Prepared pie dough is rolled out, a fruit (or savory) filling is added to the center of the dough (leaving the edges free), and the edges are folded around the filing.  How easy is that?


Even if making the dough yourself is a totally scary thing & you feel you ABSOLUTELY CANNOT make it yourself, I’ll give you a pass--after all, I don’t want to add any undue stress during such an important holiday season!  So, I’ll let you in on a little secret... You could totally make this galette using a pre-made pie dough.  Just make sure to buy the dough that is rolled out, but NOT already in the pans.  You can totally cheat on it that way (and it can remain our little secret).


But if you do want to make the dough yourself (and I hope you give it at least a try),  here are a few of my pie crust tips.  The absolute number one tip is that everything must remained cold.  With the cold snap hitting much of the US right now, cold might not be such a difficult thing :) The butter should be cold--I even pop my cut up butter into the freezer while I prepare the rest of my ingredients.  Some people go so far as to chill the bowl they plan to work with & their flour etc. You certainly may do that if you’re working in a warm kitchen or if you’re working without a food processor.  This may sound a bit redundant, but also make sure that your oven isn’t on and heating up your kitchen while you make the dough. Do you know why we want to keep everything cold? We don’t want the butter to cream together with the dry ingredients, like you would for cookie dough.  The butter should be just “cut” into the flour.  Those larger butter pieces are what will make the dough flaky once it is baked.  When the hot heat of the oven hits the pie crust, the moisture from the butter pieces will instantly turn to steam & help slightly leaven the dough, but more importantly help it to become flakey.


Work quickly.  Have everything ready to go before you start the actual crust making process: your ingredients, your bowls, your tools,.  In culinary school & when I was a Chef Instructor, we called this preparing your “mis-en-place” or “everything in its place” all ready to be used.  Read through the directions a couple of times before you begin & then work as speedily as you can in the assembly of the dough.  Working quickly keeps you from second guessing yourself and also helps to keep everything cold.


Don’t over work your dough. It’s OK to see pieces of butter in the dough--in fact it’s a good thing!  Overworked dough=tough & not flaky dough. If the dough is still a bit crumbly, that’s ok. When in doubt, work (or mix) the dough less.


Allow for adequate resting time. Give your dough some time for a “nap” in the refrigerator after you make it.  At minimum, the dough should rest an hour, but I usually make the dough the night before, if I possibly can!  Or I make it earlier and freeze it. That refrigerator time does a couple of things.  1) It helps keep everything cold. 2) It allows the moisture to distribute itself throughout the dough & to fully hydrate the starches. 3) If you’re making a crust with wheat flour, the resting process allows the gluten to relax, making it easier to roll out the dough later.


Use enough flour when rolling out the pie dough.  After the dough has rested & you’re ready to roll it out, use enough flour underneath & on top of the dough.  If I’m making a Gluten Free Crust, I use tapioca starch for rolling out.  If I’m making a regular crust with wheat flour, I use bread flour for rolling out. Once again, work quickly as you roll & keep the dough moving around on the flour. Continually dust with more flour if you see any signs of stick-age.  The absolute worst feeling is once you’ve rolled out the pie crust completely but discover it’s stuck  & cannot be picked up.  If there’s too much flour on the top or bottom surfaces, use a dry pastry brush to remove off any excess.


Start baking the pie in a hot oven. Once again, we want really flakey crust; we want the moisture in the butter to turn to steam as quickly as possible, which will help the dough to rise a bit and be more flakey.  I always start my pies at a higher temperature & then lower the temp if I start to notice too much browning.  Better to start with a high temp & turn the oven down than to just bake at a lower temp.  And you can always cover the crust with foil if it becomes too brown.  (in this post, you can see my dear grandma with her beloved, many-times-used, pie foil).


Lastly, trust yourself. The dough knows when you’re scared.  Have confidence in yourself, even if you have to feign it.  With practice, your pie & pie crust making skills will progress.  Almost no ones first pie looked perfect & that’s OK--it gives you room for improvement.  Learn from errors & know that in the end, it’s just pie :) It’ll be delicious regardless!


Gluten Free Pear Galette with Ginger Creme Anglaise 
yields 6 to 8 servings

I started making this galette when I wanted to test out a gluten free pie crust, but you can totally substitute All Purpose flour (wheat-based) if you are not following a gluten free lifestyle.  I actually am coming to prefer the GF crust to the regular one because I think it ends up a little more tender & flakey.  I like the flavors of ginger with pear, but you can always play around with the seasoning. Pie & ice cream is a classic combo, but I took it a step further & added a rich custard sauce (also known as “Creme Anglaise”) too, just for added decadence when I served this combination at a dinner party.  Do note that this galette method works with a variety of fruit items (pears, apples, stone fruit, berries etc.) but WILL NOT work with a custard-type pie (like pumpkin) or pecan. 

1 recipe pate brisee (recipe follows) 
Nonstick spray, for the baking pan
1.90 oz / 54 g / 1/2 c Brown Sugar (more or less depending on the sweetness of the pears). 
7 g / 1 Tbl Cornstarch
2 tsp Ground Ginger
Pinch Sea Salt
4 Bartlette Pears
Tapioca starch, for dusting
1 Tbl Butter, cold
1 egg
Coarse or Granulated Sugar, as needed
  1. Make the Pate Brisee (instructions below) at least 2 hours before you plan to assemble & bake the galette, though I do prefer making the dough the night before. Remove the dough from the refrigerator 10 minutes before rolling it out. 
  2. Preheat the oven to 400 F. Line a rimmed baking pan with parchment paper.  Spray the parchment liberally with the nonstick spray. Set aside (NOT, on the preheating oven, or else the pan will get too hot). 
  3. In a large bowl, mix together the brown sugar, cornstarch, ground ginger & sea salt. 
  4. Peel, core and slice the pears into thin slices.  Add the pear slices to the brown sugar mixture & toss to coat.  Add the pears as they are peeled & cut, so that they do not brown. Set aside while rolling out the crust. 
  5. Dust the counter, the rolling pin, and the top of the pie dough with tapioca starch. Add more starch as needed throughout the rolling process so that the dough never sticks to the counter or the rolling pin. Quickly roll out the dough, keeping it as circular as possible, until it reaches 13” in diameter. 
  6. Once the dough reaches the correct diameter, place the prepared pan next to the dough, gently fold the dough in half & quickly transfer it to the prepared pan.  
  7. Unfold the dough on the pan. Mound the prepared pears in the center of the dough.  Gently fold the dough up around the pears. Cut the tablespoon of cold butter into small cubes & dot the top of the galette surface with the cubes. Place the pan in the refrigerator briefly while you prepare the egg wash.  
  8. In a small bowl, vigorously whisk one egg until the yolk and white are very well mixed.   Remove the galette from the refrigerator & brush the pie dough surface with the egg wash.  Sprinkle the galette with some coarse sugar (or substitute granulated sugar, if necessary). 
  9. Immediately place the galette into the preheated oven.  Bake for 1 hour or until nicely browned, rotating the pan at the 30 minute mark. 
  10.  Remove from the oven & allow to cool on a wire rack.  
  11. Just before serving, warm the galette again in a low oven.  Top with ice cream and creme anglaise, if desired. The room temperature leftovers may be stored tightly wrapped for up to 2 days at room temperature. For longer storage, keep the galette tightly wrapped in the refrigerator or freezer & recrisp in a warm oven before serving. 
Gluten Free Pate Brisee
adapted from Martha Stewart's Cooking School
makes enough for 1 galette 

4.5 oz / 9 Tbl Unsalted Butter, cold
5.85 oz / 165 g Jeanne’s GF AP Flour (or substitute AP flour, if not following a gluten free lifestyle) 
0.30 oz / 7 g / 1 1/2 tsp Granulated Sugar
4 g / 3/4 tsp Sea Salt
1.60 / 3 Tbl + 1 1/2 tsp Ice Water (plus more,  if needed) 
  1. Cut the butter into small cubes & place in the freezer while preparing the other ingredients. 
  2. Place the flour, sugar & salt into the bowl of a food processor.  Pulse to combine. 
  3. Add the frozen butter pieces & pulse until the mixture reaches a mealy size. (remember, less is more! butter pieces are good!) 
  4. Add the water & pulse further until the dough just comes together. Note, it should never require more than 30 seconds of pulsing at the most!
  5. Dump the dough onto a piece of plastic wrap and wrap well, using the plastic wrap to help the dough become more of a flat disc shape.  Do not form the dough into a ball or sphere. 
  6. Refrigerate the dough at least an hour or two, but overnight is best.  The dough may be kept, well wrapped, in the freezer for a longer life. 
Non-food processor instructions: Use a pastry cutter instead of the food processor to cut the butter into the dry ingredients.  Continue using the same cutter when adding the water & mix just the dough just holds together.  

Ginger Creme Anglaise 
Like pie dough, creme anglaise can be a bit tricky.  This is another recipe where it is important to have all ingredients & equipment ready before beginning. Also read through the complete recipe before beginning.  

6 oz cream
2 ea yolks
30 g sugar
1 tsp Ground Ginger
1/2 tsp Vanilla Bean Paste 
  1. Prepare an ice bath by filling a large bowl with ice & a little water. Fit a smaller bowl into the larger one & set aside.  
  2. Pour the heavy cream into a small sauce pan.  Sprinkle half the sugar over the surface. Do not stir.  Heat over medium high heat to a simmer.
  3. Meanwhile, whisk the remaining sugar with the ground ginger.  Add the yolks and the vanilla bean paste. 
  4. Temper the hot cream into the yolk/sugar mixture by whisking the cream little by little into the yolk/sugar mixture until all the cream has been added.  
  5. Return the tempered mixture to the sauce pan & stir constantly with a heat tempered spatula.  Gently heat over medium heat until the mixture thickens ever so slightly and reaches “napper” (i.e. coats the back of the spatula & will hold the line when you run your finger through the back of the spatula). Be VERY careful not to overcook. The mixture should never never boil. Remove from the pan from the heat often & check for napper.  
  6. Once the mixture reaches napper, immediately remove from the heat & cool over the prepared ice bath. 
  7. Taste the cooled anglaise & adjust the ginger to your taste preferences. 
  8. Store in the refrigerator in a covered container until ready to serve or up to 2 days.