Showing posts with label Pecan. Show all posts

Cranberry Orange Jam & GF Baked Brie


Giving gifts is something I love to do, especially during the Christmas season. While I’m not opposed to buying gifts, there’s something extra special about handmaking things.


Jam (or other preserves) is always one of my go-to gift ideas because 1) it is easy to make multiple jars at a time, and 2) the jam has a shelf life of a year (or more) if processed correctly so that the lids seal, and thus the recipient can wait to open the jar, if they so desire.


This year, I’ve made a couple batches of Cranberry Orange Jam with Pecans that I’ll be giving to many of my family members and friends.  Sorry, family and friends, for the spoiler alert!  I made a version of this jam (minus the orange component) last year, but all the jars in my single batch sold out almost instantly! I didn’t even have enough left to give any as gifts.  So, this year’s remedy was to make more than one batch & not to sell any at all :)


A couple jars didn’t seal properly during the waterbath processing stage, so instead I had to refrigerate them & we’ve been enjoying them instead, not that that’s been too difficult a task!  I love eating jam on toast or english muffins or croissants, etc. but I sometimes forget that not everyone is as in to baked goods as I am.  Some people don’t know what exactly to do with a jar of jam because they have a hard time thinking outside the toast and/or pb&j box.  


One of the beauties of this particular jam is how versatile it is.  On the sweeter side, jam could be stirred into plain yogurt to create your own custom flavor, or even in to oatmeal. it could be sandwiched between two butter cookies. Warm jam could be spooned over ice cream... or pancakes... or waffles! .  Really, the possibilities are endless.

This jam is sweet, but it wonderfully compliments savory ingredients as well.  It could be served with turkey or pork. It would make a great condiment on a sandwich. And don't even get me started on paring it with cheese!


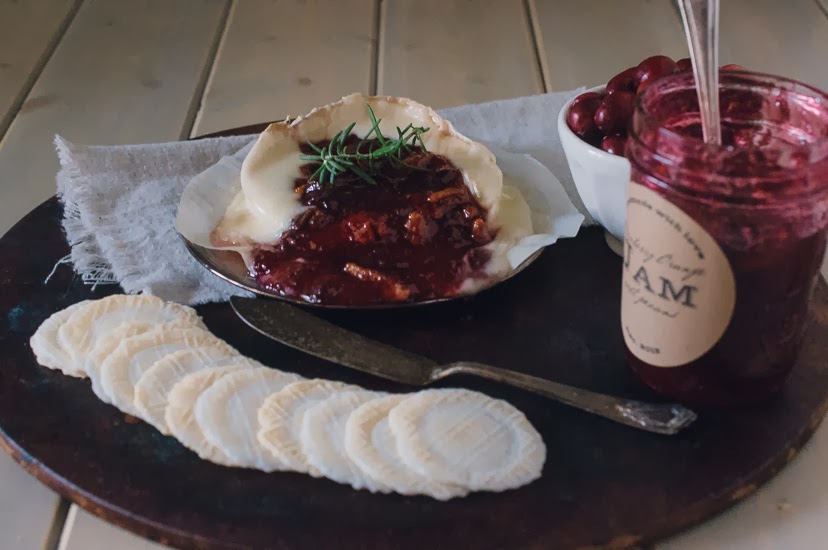
Case in point, baked brie.  Often baked brie is wrapped in puffed pastry before it is baked, but for this much more simple (and naturally gluten free) option, I simply topped a round of triple creme goat brie with a few spoonfuls of jam before baking it to oozy cheesy perfection.  The finished brie was served with some gluten free crackers, though honestly, it was difficult to not just eat the jammy cheese with a spoon!


So, if you’re still searching for gift options, consider making a batch of preserves of some sort.  And, tying a small Cinnamon Applesauce Ornament is a great way to dress up any jars for gift giving.


Cranberry Orange Jam with Pecans 
Adapted from Kraft Recipes
yields 6 half pint jars, plus a little extra for the fridge

1 12 oz bag of fresh cranberries
1 c (8 fl oz) Orange Juice, 
1/2 c (4 fl oz) Water
zest of half an orange
45.5 oz (6 1/2 c) Granulated Sugar 
1 c Chopped Pecans
1 pouch Certo liquid pectin 

  1. Fill a large stock pot with water & bring to a simmer.  Add a splash of white vinegar to the water if the water is hard. Wash 6 half pint jars, along with rings and new lids. Let stand in hot water until ready to use. 
  2. In a second large stock pot, bring the cranberries, orange juice and water to a boil over high heat. Reduce the heat to low, cover and simmer for 10 minutes. 
  3. Infuse the sugar with the orange zest.  Add the infused sugar and nuts to the prepared heat. Increase the heat to high heat and bring to a rolling boil, stirring constantly. Remove the pot from the heat. Stir in the pectin, return to the stove & boil for exactly 1 minute, stirring constantly. 
  4. Remove the pot from the heat and skim off any foam that may have developed.  Increase the heat under the first water-filled stock pot to high. 
  5. Portion the jam into prepared jars, leaving 1/8” headroom. Run a knife around the edges of the jam to remove any potential air pockets. Add a little additional jam to the jar, if necessary. Wipe the rim & threads of the jars. Cover with the lids& screw on the rings until they are finger tight. 
  6. Lower the jars into the boiling water & cover the pot. Process the jars for 10 minutes. Remove the pot from the heat, and let stand for 5 minutes before removing the jars.  Let the jars cool completely. If after cooling any jars have not sealed, store those in the refrigerator. The sealed jars will keep at room temperature for 1 year.
Note: If you’re completely new to canning, Food In Jars has some great resources!  


Gluten Free Baked Brie with Cranberry Orange Jam 
adapted from The Kitchn 

1 round of brie cheese--I used a triple creme goat brie that was 6.5 oz in size
Cranberry Orange Pecan Jam 
Additional Pecans (optional)
Fresh herbs to garnish--I used Rosemary 
Crackers for serving-- I used ones like these.
  1.  Preheat the oven to 425 F. 
  2. Cut off the top of the brie & scoop out a bit of the center. 
  3. Place the cheese onto a piece of parchment paper and onto a baking dish. 
  4. Top the cheese with several spoonfuls of jam & extra pecans, if desired. Place into the oven.
  5. Bake for 8 to 10 minutes, or until the cheese is softened, but has not completely collapsed.  
  6. Remove from the oven & use the parchment paper to lift the cheese onto a serving platter. Garnish with a sprig of herbs & serve with crackers. 


Pecan Pie (GF)


Sometimes, we do not fully realize a person’s influence on us until they are no longer with us. Case in point, my friend Chef John Michael Lerma, who sadly, at the age of 52, passed away earlier this month.


John Michael, or JML as he is often referred to, was a native of my home state of North Dakota & also attended my alma mater, the University of North Dakota, though in the past years, he resided in the Twin Cities area of Minnesota.  In addition to being a noted food writer, cookbook author, and competitor in culinary competitions, he also taught in various demonstration kitchens, was a representative for Emile Henry bakeware, and he lead culinary vacations (!!) to both Italy & Mexico.


While I was working at the University of North Dakota Wellness Center, both in the marketing department and as an instructor for the Culinary Corner Demo Kitchen, John Michael did several guest demonstrations. He also cooked for us demo kitchen employees a few times & just talked to us about life and experiences.  He had such a big heart & truly loved food (and people). I was so saddened to hear of his passing.


When I met John Michael, I was in an interesting place in life... I knew I would be moving to South Carolina the following year to fulfill my dream of attending culinary school, but I didn’t really know what life would bring beyond that. Having also earned an art degree in graphic design/photography and also having worked in a marketing department, I really appreciated an atmosphere of collaboration & helping your fellow artists become the best they could be. But it seemed to me as though kitchens were often more competitive than collaborative. John Michael really embodied the spirit of collaboration I found was lacking in many kitchens. It was easy to tell from conversations with him one-on-one and from seeing him teach a room full of eager pie fans how excited he was about sharing his knowledge with others. He genuinely cared about his audience & wanted them to be as successful as possible in their kitchen endeavors. He was genuine, not at all afraid to reveal his own tricks & tips.


John Michael was famous for many food items (I still love to make his pizza dough & this amazing creamed mushroom dish I saw him demo once), but pies were one of his specialties.  He won seven (!) national pie competitions & his second cookbook is entirely pie themed.  I thought the best tribute to him was to make a pie in his memory. And to make that pie in the pink Emile Henry pie dish he graciously gave to me (and autographed) on one of his visits.  With Thanksgiving around the corner, making his pecan pie recipe, adapted to be gluten free, seemed the most appropriate.


In preparation to make this pie & write this post, I reflected on my experiences with John Michael Lerma. I like to think that perhaps his genuine, caring manner has influenced my own style, both when I was teaching in a culinary classroom, and now as I “teach” through blogging. I hope that I can portray even a fraction of his passion for food & for others. I will also forever remember him as the person who introduced me to the wonderful world of Vanilla Bean Paste(which truly is one of my favorite baking ingredients).


John Michael, you will be missed!  But your legacy will live on in your cookbooks & in the many lives you touched!

Pecan Pie (GF) 
adapted from Garden County Pie
yields 8 servings 

1 recipe GF Pate Brisee 
tapioca starch for dusting 

FILLING
4 large eggs, room temperature, well beaten
5.25 oz / 3/4 c Granulated Sugar
2.65 / 1/3 c melted unsalted butter
3.65 oz / 1/3 c pure maple syrup (NOT pancake syrup)
5.5 oz / 1/2 c light corn syrup
5.5 oz / 1/2 c dark corn syrup )i only had 4 oz, so i added an additional 1.5 oz of light) 
2 tsp vanilla bean paste
1 tsp Bourbon (optional) 
1/4 tsp sea salt
1 1/2 c pecans, broken, plus additional for decorating the top of the pie (for me it was 3.9 oz +2 oz inside) 

Whipped Cream for serving, optional 
  1. Make the pie dough & allow it to rest in the refrigerator at least 2 hours (overnight is even better. 
  2. When ready to assemble the pie, remove the dough from the refrigerator & place it on a surface that has been well dusted with tapioca starch. Dust the top of the dough & the rolling pin with additional tapioca starch.  
  3. Quickly roll out the dough, keeping it as circular as possible, until it is a little larger than a 9” pie pan.  Move the dough around on the counter/board to make sure it isn’t sticking.  
  4. Gently fold the dough in half & place it into the center of the pie pan.  Unfold the dough & press it lightly with your finger tips & knuckles until it is formed to the pan.  Use a knife or kitchen sheers to cut off any excess.  Place the pan into the refrigerator while the rest of the filling is made.
  5. Preheat the oven to 375 F. 
  6. In a large bowl, whisk together the eggs, granulated sugar, melted butter, pure maple syrup, corn syrups, vanilla bean paste, bourbon and sea salt. Add the pecans & stir to combine.
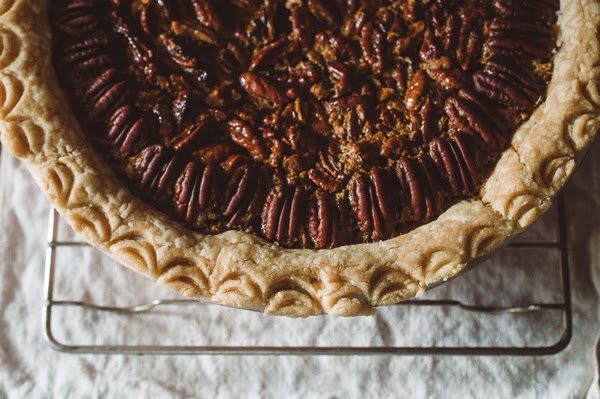
  7. Remove the prepared crust from the refrigerator & set on top of a rimmed sheet pan. Optional, use the edges of a spoon to make the scalloped pattern by gently rolling the tip of the spoon (I used an ice tea spoon) over the edge of the dough. Add a divot inside each scallop.  
  8. Pour the prepared filling into the crust.  Place additional pecan halves around the edge of the pie, if desired.
  9. Bake for 20 minutes at 375 F, then reduce the oven to 350 and bake for an additional 40 to 50 minutes.  Check the pie often in the end stages & cover the edges of the pie with foil if they become too dark.  When the pie is done, the edges should be set & the center will be just a little wobbly.
  10. Remove the pie from the oven & allow to cool completely. Refrigerate, if possible, a couple hours before serving--this will make cutting the pie easier. 
  11. Cut into pieces & serve with whipped cream, if desired. The crust will be very crumbly, but delicious. Leftovers can be stored room temperature in a covered container, but the pie is easier to cut and serve when refrigerated. 
This post contains affiliate links. 

Cowgirl Cookies

To continue my “Week in the [Project] Life” series for Project Life 365, today’s prompt is #whatever.  For background on this project, please read my previous #breakfast#lunch, #dinner, and #dessert posts. You can find me on Instagram @lauravein and Project Life 365 at @projectlife365.

"#Whatever is worth doing at all is worth doing well.” -Lord Chesterfield (1694-1773) Life is too short for bad cookies (or bad coffee)...  And if you want to eat a couple for breakfast, I’ll never tell! 

They have oatmeal in them after all :)


I'm not exactly certain about the background on the name of these cookies, but Cowgirl Cookies been one of my favorites since I first made them in culinary school.  They're full of oatmeal, coconut, pecans, chocolate chunks & plenty of spices!  Talk about a flavor explosion in a cookie.


Oats haven't made an appearance in my diet much at all in the past couple of years, nor have I eaten much gluten in the past year.  However, in preparation for some medical testing,  I have been doing some "cheating," because a few of the tests are more accurate if I actually have a little gluten in my system.


If I'm having a last hurrah with gluten (I'll find out once I complete my testing & the results come back), I want to be certain I am making and eating things that are worth it! Things that I will miss if I'm officially told to say goodbye to gluten forever. Things that use good, high quality ingredients. Not just eating gluten-y things for gluten sake. With wheat flour from King Arthur, locally sourced pecans, oats from Bobs Red Mill, and good chocolate, I'm confident these cookies fit the bill :)


Cowgirl Cookies


I cut down this recipe from the giant culinary school batch to a more manageable home batch.  I’m sorry I don’t have a yield amount.... We started eating the cookies before I could get an accurate count! 


4 oz Unsalted Butter, room temperature
3.65  oz Granulated Sugar
4 oz Brown Sugar
2 large Eggs
2 tsp Vanilla
5.30 oz AP Flour {you could also make these Gluten Free by using a GF baking mix}
4 g Baking Powder
4 g Baking Soda
1 1/2 tsp Cinnamon
scant 1/2 tsp Salt
6.65 oz Chocolate Chunks {I chopped up some Trader Joe’s chocolate} 
2.5 oz Oats {use Gluten Free, if you like} 
2.65 oz Sweetened Shredded Coconut
2.35 oz Chopped Pecans  

  1. In the bowl of an electric mixer fitted with the paddle attachment, cream the butter with the sugars on medium low speed until the ingredients completely mix together, become lighter in color & increase in volume.  Scrape down the bowl. 
  2. Add the eggs, one at a time, and mix at low speed until just incorporated.  Add vanilla. Scrape down the bowl and mix a few more seconds. 
  3. In a separate bowl, whisk together the flour, baking powder, baking soda, cinnamon & salt.  
  4. Add the dry ingredients to the mixing bowl & mix on low speed until half way combined.  
  5. Combine the chocolate, oats, coconut & pecans and add them to the mixing bowl.  Mix on low speed until the ingredients are just incorporated, scraping the sides as necessary.  
  6. Refrigerate the dough for 30 minutes while the oven is preheating to 350 F. Line to baking sheets with parchment paper. 
  7. For large cookies (which I believe have the best combinations of textures: crunchy edges & soft centers), use a large cookie scoop (mine is 3oz) and pan the cookies 6 to a half sheet pan. 
  8. Bake in the preheated oven for 10 minutes, then rotate the pan & bake an additional 4 to 6 minutes, or until the edges just begin to brown. Remove from the oven & cool completely. 
  9. Store baked cookies in an airtight container at room temperature or in the freezer. (I happen to think these cookies are fabulous when eaten straight from the freezer... though don’t damage your teeth in the process!). 

Note: if you make smaller cookies, pan them in 4 rows of 3 & bake them less time, rotating as necessary, until the cookie edges are just beginning to brown.