Showing posts with label Maple. Show all posts

Passion Fruit Yogurt Parfaits with Cassava Crumble (AIP, low FODMAP, Paleo, Vegan)

Passion Fruit Yogurt Parfait with Cassava Crumble (AIP, low FODMAP, Paleo, Vegan)

For the past month or so, I’ve been making at least one batch of AIP two-ingredinet Instant Pot coconut yogurt a week, as I developed & finessed the recipe. I’ve used the yogurt in several applications, but this parfait might be one of my favorite sweet servings. I love using just a hint of maple & letting the sweet/tart flavor of the yogurt + fruit shine through. And let’s not forget about the crunch of the toasted cassava crumble, which makes a great stand-in for granola.

Passion Fruit Yogurt Parfait with Cassava Crumble (AIP, low FODMAP, Paleo, Vegan)

I’m not really sure if this passion fruit coconut yogurt parfait should be classified as a treat or as a breakfast food. For the sake of AIP nutrient density guidelines, it should probably be a treat, but I must admit, I have eaten one or two for breakfast, alongside a serving of protein and vegetables.  

Passion Fruit Yogurt Parfait with Cassava Crumble (AIP, low FODMAP, Paleo, Vegan)

Passion fruit isn’t always easy to find, but often Asian grocery stores will carry it. Back in August, I was thrilled to find actual passion fruits on sale at Whole Foods. I really, really love the tart, flower-y flavor of passion fruit--it’s almost like sour candy for adults. We even had passion fruit curd filing on one of our wedding cakes. And passion fruit is low FODMAP too! Yay! Just don’t eat more than 5 at one time….   

Passion Fruit Yogurt Parfait with Cassava Crumble (AIP, low FODMAP, Paleo, Vegan)

When ripe, the fruit should be dark purple on the exterior & wrinkly. Cut the ripe fruit in half & use a spoon to scoop out the pulp & seeds--both are edible. I personally like the crunch of the seeds, but you could go through the laborious task of straining out the seeds, if desired. 

Passion Fruit Yogurt Parfait with Cassava Crumble (AIP, low FODMAP, Paleo, Vegan)

This parfait could be made with other fruit too, if passion fruit can’t be found or aren’t to your liking. I’ve also tried mixed berries (blueberries/strawberries/raspberries are all low FODMAP), as well as a rhubarb compote similar to this one (substituting maple for the honey to keep it low FODMAP). 

Passion Fruit Yogurt Parfait with Cassava Crumble (AIP, low FODMAP, Paleo, Vegan)

Note on FODMAPs: FODMAPs are confusing things... Certain resources will say that one item is “ok” and other resources will list that item as “avoid.” I am choosing to get my information about FODMAPs from Monash University & their app. Monash is continually updating their information & they are great about listing what quantity of food (both by volume & by weight) keeps it within the low FODMAP guidelines. As always, though, you know your body best. Just because one list says a food is fine, doesn’t always mean your body will be fine with it. Or on the flip side, just because one list says a food is on the avoid list, doesn’t mean your body is automatically going to be bothered by it. Do what makes your body & mind feel the best.

Passion Fruit Yogurt Parfait with Cassava Crumble (AIP, low FODMAP, Paleo, Vegan)

Passion Fruit Yogurt Parfaits with Cassava Crumble (AIP, low FODMAP, Paleo, Vegan) 

Crumble
1/8 tsp Sea Salt
1 1/2 tsp Grade B Maple Syrup
28 g / 2 Tbl Coconut Oil
  1. Preheat oven to 350 F. Line a baking sheet with parchment paper. 
  2. Mix all the ingredients with a fork in a small bowl until the ingredients are crumbly. 
  3. Spread in an even layer (clumps are ok) on the prepared baking sheet. 
  4. Bake for 10 minutes, rotate the pan, and bake an additional 5 to 10 minutes, or until golden. Set aside to cool
Vanilla Maple Coconut Milk Yogurt
yields enough for 3 parfaits 

1 c Two Ingredient Instant Pot Coconut Yogurt (or other AIP-compliant coconut yogurt) 
  1. Add all the ingredients to a mixing bowl. Stir to combine. Reserve in the refrigerator until ready to assemble parfaits & serve. 
Assembly--per parfait 
**assemble right before serving**

1/3 c Vanilla Maple Coconut Milk Yogurt 
seeds from 1 Ripe Passion fruit
1 Tbl Crumble 
  1. Portion the yogurt into a small bowl or other small vessel. 
  2. Top the yogurt with half of the passion fruit pulp/seed. 
  3. Sprinkle the crumble over the top. Add the remaining passion fruit. 
  4. Serve immediately. 
This post contains affiliate links. Thanks for supporting Sweet Treats. 

Stovetop Peach Blueberry Crisp (Paleo & Vegan)


“...the girls put their wits to work, 
and necessity being the mother of invention, 
made whatever they needed.” 
-Louisa May Alcott, Little Women. 

Since we don’t have a working oven at my family’s lake cabin in Minnesota, I had to be a little creative when it came to planning meals & treats. We made use of the stove top, outside grill, microwave & slow cooker for the main dishes & vegetables, but dessert was a little more challenging, especially considering my Autoimmune Protocol (AIP) dietary parameters.


There’s something about being around water all day that makes a person extra hungry. And, of course, the “I’m-on-vacation-and-am-allowed-to-splurge-a-little” thinking. In past years, splurging would have meant driving to the nearby gas station for half a gallon of ice cream & a can of Hershey’s syrup, or making s’mores around a beach fire, or eating packages of cookies. But thankfully, my family has been oh so understanding about what I can and cannot eat & they were on board with some AIP & Paleo splurges instead of our normal treats. We brought along some Coconut Milk Ice Cream , and I also made coconut milk panna cotta (with nectarines instead of berries).


Then one day, when the weather was grey, windy & rainy, I wanted to create a dessert that leaned more towards warmth and comfort than to cold & refreshing. We had some peaches that were nearly over-ripe & a bag of frozen blueberries that were originally slated for making smoothies. Almost immediately, the thought of a crisp/crumble came to mind….

But how do you make a crisp without the oven? Easy. First, toast the topping in a skillet, then, once the topping is done & moved to a bowl, cook the fruit on the stovetop. Spoon the cooked fruit into bowls & top with the previously made crumble. Voila, fruit crisp, sans oven :)


I’ve previously made gluten free crisps & crumbles (like this one and this one), but grain free baking is still a new territory to me. I’m still cautious about working with different ingredients, like liquid sweeteners (i.e honey & maple syrup), arrowroot starch, coconut flour, and even coconut oil, but I am attempting to be more brave in my experimentation. It looks like I’ll probably be following some version of Paleo for the rest of my life, so I might as well get use to it :) Fortunately, crisps and crumbles are a bit more forgiving & don’t require quite as much scientific precision as say a cake or cookie needs. 


Since I am in the reintroduction phase of the Autoimmune Protocol & almonds seem to be ok (just in not giant quantities), I used a mixture of coconut flour & almond flour in the topping, but if you’re not yet to reintroducing almonds, using more coconut flour would also work. As I toasted the topping on the stove, several family members could smell its fragrance & came over to see what I was concocting--that’s always a good sign.


When we were ready to eat dessert, I spooned the thickened fruit into bowls & let each person top their own dish with as much crumble as he or she wanted. I’m usually a fan of ice cream on my crisp (or whipped cream), but this time, I splashed a little coconut milk to mimic the creaminess. We were all satisfied by how delicious it was & no one felt deprived by this “healthier” dessert. I’ll be remembering this stovetop method in the future for times when it simply is too hot to turn on the oven :)


Stovetop Peach Blueberry Crisp
serves 4 

42g / 5 Tbl Coconut Flour
56 g / 1/2 c Almond Flour (AIP Modification: omit almond flour & increase coconut flour instead)
1/4 tsp Sea Salt
1 tsp Ground Cinnamon
42 g / 3 Tbl Coconut oil, melted
1.5 oz / 2 Tbl Honey

300 g / 1.5 c Frozen Blueberries (may substitute fresh, but add a little water too)
2 medium-large peaches (around 400g), cut into thin slices, peeling is optional
2.75 oz / 4 Tbl Pure Maple Syrup 
1 Tbl Lemon Juice

Coconut Milk, for serving 
  1. To make the crumble topping: combine the coconut flour, almond flour, sea salt, and cinnamon in a small bowl.  Drizzle in the coconut oil & honey.  Mix with a fork until crumbly. 
  2. Toast the crumble in a large skillet over medium high heat, stirring constantly, for a couple of minutes, or until the crumble begins to brown slightly & smell toasty. Remove from the skillet & set aside. Give the skillet a quick rinse. 
  3. To make the filling: add the blueberries and peaches to the skillet. Drizzle with maple syrup and lemon juice  Cook over medium heat until the juices begin to boil. Cover the skillet, reduce the heat to a simmer & cook until the peaches are tender--approximately 10 minutes. Stir occasionally, as needed. Taste & add additional maple syrup if the filling isn’t sweet enough. 
  4. Remove 1/2 c of liquid from the pan & place into a small bowl. Into the liquid, stir in the arrowroot, making sure there are no lumps. Add the mixture back to the skillet and cook for an additional minute to allow the fruit to thicken & to cook out any starch flavor from the arrowroot. Remove from the heat. 
  5. Just before serving, spoon the fruit into bowls & sprinkle with the crumble topping (note: there may be leftover crumble topping). Top with a splash of coconut milk or a scoop of coconut milk ice cream. 
  6. Store any leftover fruit filling in the refrigerator. Keep any leftover crumble topping tightly covered at room temperature. 

This post contains affiliate links. 

Pecan Pie (GF)


Sometimes, we do not fully realize a person’s influence on us until they are no longer with us. Case in point, my friend Chef John Michael Lerma, who sadly, at the age of 52, passed away earlier this month.


John Michael, or JML as he is often referred to, was a native of my home state of North Dakota & also attended my alma mater, the University of North Dakota, though in the past years, he resided in the Twin Cities area of Minnesota.  In addition to being a noted food writer, cookbook author, and competitor in culinary competitions, he also taught in various demonstration kitchens, was a representative for Emile Henry bakeware, and he lead culinary vacations (!!) to both Italy & Mexico.


While I was working at the University of North Dakota Wellness Center, both in the marketing department and as an instructor for the Culinary Corner Demo Kitchen, John Michael did several guest demonstrations. He also cooked for us demo kitchen employees a few times & just talked to us about life and experiences.  He had such a big heart & truly loved food (and people). I was so saddened to hear of his passing.


When I met John Michael, I was in an interesting place in life... I knew I would be moving to South Carolina the following year to fulfill my dream of attending culinary school, but I didn’t really know what life would bring beyond that. Having also earned an art degree in graphic design/photography and also having worked in a marketing department, I really appreciated an atmosphere of collaboration & helping your fellow artists become the best they could be. But it seemed to me as though kitchens were often more competitive than collaborative. John Michael really embodied the spirit of collaboration I found was lacking in many kitchens. It was easy to tell from conversations with him one-on-one and from seeing him teach a room full of eager pie fans how excited he was about sharing his knowledge with others. He genuinely cared about his audience & wanted them to be as successful as possible in their kitchen endeavors. He was genuine, not at all afraid to reveal his own tricks & tips.


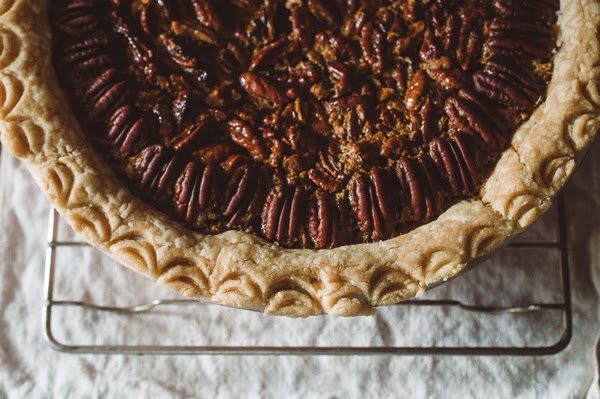
John Michael was famous for many food items (I still love to make his pizza dough & this amazing creamed mushroom dish I saw him demo once), but pies were one of his specialties.  He won seven (!) national pie competitions & his second cookbook is entirely pie themed.  I thought the best tribute to him was to make a pie in his memory. And to make that pie in the pink Emile Henry pie dish he graciously gave to me (and autographed) on one of his visits.  With Thanksgiving around the corner, making his pecan pie recipe, adapted to be gluten free, seemed the most appropriate.


In preparation to make this pie & write this post, I reflected on my experiences with John Michael Lerma. I like to think that perhaps his genuine, caring manner has influenced my own style, both when I was teaching in a culinary classroom, and now as I “teach” through blogging. I hope that I can portray even a fraction of his passion for food & for others. I will also forever remember him as the person who introduced me to the wonderful world of Vanilla Bean Paste(which truly is one of my favorite baking ingredients).


John Michael, you will be missed!  But your legacy will live on in your cookbooks & in the many lives you touched!

Pecan Pie (GF) 
adapted from Garden County Pie
yields 8 servings 

1 recipe GF Pate Brisee 
tapioca starch for dusting 

FILLING
4 large eggs, room temperature, well beaten
5.25 oz / 3/4 c Granulated Sugar
2.65 / 1/3 c melted unsalted butter
3.65 oz / 1/3 c pure maple syrup (NOT pancake syrup)
5.5 oz / 1/2 c light corn syrup
5.5 oz / 1/2 c dark corn syrup )i only had 4 oz, so i added an additional 1.5 oz of light) 
2 tsp vanilla bean paste
1 tsp Bourbon (optional) 
1/4 tsp sea salt
1 1/2 c pecans, broken, plus additional for decorating the top of the pie (for me it was 3.9 oz +2 oz inside) 

Whipped Cream for serving, optional 
  1. Make the pie dough & allow it to rest in the refrigerator at least 2 hours (overnight is even better. 
  2. When ready to assemble the pie, remove the dough from the refrigerator & place it on a surface that has been well dusted with tapioca starch. Dust the top of the dough & the rolling pin with additional tapioca starch.  
  3. Quickly roll out the dough, keeping it as circular as possible, until it is a little larger than a 9” pie pan.  Move the dough around on the counter/board to make sure it isn’t sticking.  
  4. Gently fold the dough in half & place it into the center of the pie pan.  Unfold the dough & press it lightly with your finger tips & knuckles until it is formed to the pan.  Use a knife or kitchen sheers to cut off any excess.  Place the pan into the refrigerator while the rest of the filling is made.
  5. Preheat the oven to 375 F. 
  6. In a large bowl, whisk together the eggs, granulated sugar, melted butter, pure maple syrup, corn syrups, vanilla bean paste, bourbon and sea salt. Add the pecans & stir to combine.
  7. Remove the prepared crust from the refrigerator & set on top of a rimmed sheet pan. Optional, use the edges of a spoon to make the scalloped pattern by gently rolling the tip of the spoon (I used an ice tea spoon) over the edge of the dough. Add a divot inside each scallop.  
  8. Pour the prepared filling into the crust.  Place additional pecan halves around the edge of the pie, if desired.
  9. Bake for 20 minutes at 375 F, then reduce the oven to 350 and bake for an additional 40 to 50 minutes.  Check the pie often in the end stages & cover the edges of the pie with foil if they become too dark.  When the pie is done, the edges should be set & the center will be just a little wobbly.
  10. Remove the pie from the oven & allow to cool completely. Refrigerate, if possible, a couple hours before serving--this will make cutting the pie easier. 
  11. Cut into pieces & serve with whipped cream, if desired. The crust will be very crumbly, but delicious. Leftovers can be stored room temperature in a covered container, but the pie is easier to cut and serve when refrigerated. 
This post contains affiliate links. 

Pumpkin Pancakes (GF) & Project Life 365

Things have been a little quieter around here lately, but it has been for good reason!  Recently, I showed a couple of teaser shots on Instagram about a special project I’ve been working on, and today I finally get to explain what that is!  AND there will be a blog post every day (!) this week, so don’t forget to check back.

#breakfast: Pumpkin Pancakes with butter & maple syrup.  

In January, I started a photo-a-day project called Project Life 365.  I had been following their parent company Design Aglow for several years & I was intrigued by PL365‘s “spin” on the concept. Yes, I’ve tried (and failed at) photo-a-day projects in the past, but PL365 is unique...  Not only do I take a photo each day, but PL365 has a specific word or phrase or prompt for each day. Having specific direction helps to keep me creative and challenges me to perhaps photograph things I wouldn’t normally shoot.  I also really enjoy the community aspect of knowing people throughout the world are participating in this same photo project. While I don’t normally do the whole multiple hashtags thing, I now really enjoy clicking on the #projectlife365 hashtag on Instagram each day & seeing what other artists are creating & how different people interpret each hashtag.  There are some seriously amazing photographers working on Project Life 365!


About a month ago, Project Life 365 contacted me, asking if I’d like to participate in their “Week in the [Project] Life” series.  Me? Really? I was so humbled & so honored!  As I looked ahead to the weeks that were available for my feature, I saw that one week in particular (November 10-17) was full of food words. Obviously, that week was meant for me :) To take the project a step further, I decided to shoot each day’s prompts with my iPhone for PL365 AND to do a blog post with the recipe for each item I’d photographed.  So, today I’m beginning with #breakfast: Pumpkin Pancakes. 


I dearly love experimenting with new breakfast recipes on most weekends. I first began making these pumpkin pancakes when I discovered a container of extra pumpkin puree in the refrigerator one Saturday morning.  I made a few easy adaptions to the original recipe, swapping the AP flour for GF flour and increasing both the spices & pumpkin amounts. We thoroughly enjoyed eating them for brunch that Saturday & the leftovers were great during the following week.

Something about fall just begs for as many pumpkin recipes as possible! Check back tomorrow for my #lunch post (and for a link to my "Week in the [Project] Life" interview).


Pumpkin Pancakes
adapted from Martha Stewart

5.30 oz / 1 1/4 c AP Flour {I used Jeanne’s GF AP Mix to make them Gluten Free}
39 g / 3 Tbl Brown
9 g / 2 tsp Baking Powder
8 g / 2 tsp Cinnamon
1/2 tsp Ginger
1/2 tsp salt
1/4 tsp Freshly Grated Nutmeg
pinch ground cloves
10 oz / 1 1/4 c Milk, room temperature, if possible 
293 g / scant 1 cupPumpkin Puree 
1.5 oz / 3 Tbl Butter, melted, plus additional for the pan
1 large egg, room temperature, if possible 

Butter & maple syrup for serving 

  1. In a large bowl, whisk together the flour, sugar, baking powder, spices & salt. 
  2. In a separate bowl, whisk together the milk, pumpkin puree, butter & egg. Add the dry ingredients to the wet ingredients & whisk until just combined.  
  3. Heat a skillet over medium heat & grease generously with butter.  Pour in 1/4 cup of batter & gently spread out.  Cook until browned, approximately 3 minutes per side.  
  4. Hold finished pancakes in a 200 F oven until ready to serve. Greas
  5. Serve pancakes with additional butter & maple syrup. 
  6. Store any leftovers, wrapped, in the refrigerator for up to 5 days or in the freezer for longer periods of time.  
Note: The cooking process for these pancakes can be a bit tedious, but they are very tasty in the end!  They are not the easiest pancakes to flip, but with some practice, the flipping becomes easier. Also, the can go from golden to almost burned very quickly. After experimenting with different pan types & discovered that a nonstick skillet, greased with a little butter (clarified, if possible) works the best.  If using a regular stainless steel skillet, make sure to generously butter it between each batch of pancakes.

Prop sources
Dishes: vintage
background: handwoven towel from Whimsy & Tea. 

Waffle Weekend: Spiced Pumpkin Waffle Doughnuts (GF)


We have reached the time of year where everything turns to pumpkin.  Sweet pumpkin desserts. Savory pumpkin dishes. Drinkable pumpkin. Pumpkin decor.  (if you don’t believe me, just check Pinterest or Instagram).


Personally, I’ve been craving pumpkin doughnuts. And pumpkin spice lattes (but that will come in a future post....).  Sadly, I have not found too many gluten free pumpkin options, but that means I simply must make something myself!


Three years ago, I fried pumpkin spice cake doughnuts  for a Daring Bakers challenge.  I liked the recipe so much that I included it in the doughnut day of Laminated Doughs when I taught that class at the Culinary Institute of Charleston.


I’ve been thinking about those doughnuts lately, but I haven’t been so keen on the frying part.  While I don’t mind frying (since I conquered my fear of frying), but I do hate the mess it makes & how the smell of oil permeates our small open concept apartment.  And opening the windows is not an option since temperatures are still in the upper 90s....


Remembering the waffle doughnut method I concocted early last summer, I decided to turn the fried cake doughnuts into waffle doughnuts!  Less messy and smelly yet still delicious.  They’re even better when they're dunked in maple glaze & paired with a homemade pumpkin spice latte :)


Pumpkin Spice Waffle Doughnuts 
adapted from here

14.9 oz / 3.5 c Jeanne's GF AP Flour Mix (or use AP flour, if you're not GF) 
4 tsp Baking Powder
1 tsp Salt
1 Tbl Cinnamon
1 tsp Ginger
0.5 tsp Baking Soda
0.5 tsp Nutmeg, freshly grated if possible
pinch Cloves

3 Tbl Butter 
1 c Sugar

1 ea Egg
2 ea Yolks
1 tspVanilla

1/2 c + 1 Tbl Buttermilk
8.7 oz / 244 g / 1 c Canned Pumpkin 

  1.  In a large bowl whisk together the dry ingredients. Set aside. 
  2. In the bowl of an electric mixer fitted with the paddle attachment, cream the butter with the sugar on low speed--the mixture will be lumpy. 
  3. Add the egg & yolks, one at a time, mixing on low.  Scrape down the sides. 
  4. Add the buttermilk, mixing on low. Add the pumpkin, mixing on low. 
  5. Add the dry ingredients in two batches. 
  6. Let the batter rest while the waffle iron preheats. If you can, set the temperature to medium high. 
  7. Drop heaping tablespoons of batter onto the waffle iron. Cook until very lightly browned
  8. Cool slightly. Glaze, if desired. These waffle doughnuts are best consumed the day they are made. 


Maple Glaze
8 oz, 2 c Powdered Sugar
4 Tbl Milk
4 Tbl Real Maple Syrup
sprinkle of Cinnamon  & freshly grated Nutmeg 

  1.  Sift the sugar into a small bowl. Whisk in the milk & maple syrup. 
  2. Add the cinnamon & nutmeg. 
  3. Use immediately, or cover & refrigerate until ready to use.  


Waffle Weekend: Cornmeal Waffles with Blueberry Nectarine Maple Compote


In a perfect world, every Saturday would allow for sleeping in and eating waffles for brunch.  But let’s be honest, those weekends don’t regularly happen.


Case in point, this past weekend. Just because we couldn’t have a leisurely brunch did not mean waffles should be entirely forgotten.  Instead, we had to change our thinking slightly.  


Waffles are equally delicious in the evening as they are for breakfast, especially this cornmeal version that is reminiscent of a cornbread/waffle hybrid.  Add a side of crunch, oven cooked bacon (not pictured, as it was still baking during these photos) and some warm Blueberry Nectarine Maple Compote & we had the perfect Saturday supper.  


p.s. Don’t you just love these heart-shaped waffles? One of the many highlights of this housesitting adventure has been utilizing their adorable waffle iron.


Blueberry Nectarine Maple Compote
adapted from Serious Eats

Note: I like to start the compote first so that it can be simmering while I prepare & cook the waffles.  

1c Fresh Blueberries
1/4 c Maple Syrup (the real stuff, NOT pancake syrup) 
1 1/2 tsp Lemon Juice
1/4 c Water
1/2 c Brown Sugar
1 nectarine, peeled & sliced into thin wedges
1/4 tsp Cinnamon

  1. In a small stainless steel sauce pan, combine the blueberries, maple syrup, lemon juice and water.  Bring to a boil over medium high heat, then reduce the heat to simmer & cook for 5 minutes.  Stir occasionally.
  2. Add the brown sugar & nectarine to the pot. Simmer an additional 30 minutes, stirring as needed. 
  3. Remove from the heat & add the cinnamon.  Serve warm. Store any leftovers for up to 1 month in the refrigerator. 
Cornmeal Waffles
adapted from Williams-Sonoma 

Note: Because I was low on ingredients and was only cooking for 2, I made a half recipe. But if you are planning to serve more than 2 people, I'd highly recommend doubling the recipe.  

1/2 c Flour (I used Jeanne’s AP Gluten Free Mix)
1/2 c Cornmeal
1 tsp Baking Powder
1/4 tsp Baking Soda
1/8 tsp Salt
1 c Buttermilk (I didn’t have enough, so I used some regular milk & mixed a little lemon juice into it)
1 egg
2 Tbl Maple Syrup (the real stuff, NOT pancake syrup)
2 Tbl Vegetable Oil, plus more for the waffle iron  
  1. Preheat the waffle iron to a low setting.  
  2. In a liquid measuring cup, if making your own buttermilk, mix together the regular milk with a tsp of lemon juice & set aside. 
  3. In a medium sized bowl, whisk together the dry ingredients (flour, cornmeal, baking powder, soda & salt).  
  4. Add the remaining ingredients to the liquid measuring cup & whisk together.  
  5. Pour the liquid ingredients into the dry ingredients & stir just until combined.  
  6. Portion the prepared batter onto the greased, hot waffle iron & cook according to the manufacturer’s instructions.  Place the finished waffles in a single layer onto a baking rack-lined sheet pan & place into a 250 F oven to keep crisp until ready to serve.