Showing posts with label Frozen Dessert. Show all posts

Paleo Mocha Frappé, two ways

Paleo Mocha Frappe
(left) Paleo frappé, (right) almost paleo frappé 

Instead of giving a traditional gift to my dad this year for Fathers Day, I “paleo-ified” one of his favorite non-paleo treats, a Mocha Frappé, and gave him the recipe.  My parents have followed paleo for several years, even long before I jumped on the AIP bandwagon. My dad saw great improvements to his seasonal allergies once he eliminated grains, sugars & dairy from his regular diet.

Paleo Mocha Frappe Ingredients

Almost Paleo Mocha Frappe Ingredients

Since my dad does not have diagnosed chronic or autoimmune health conditions that I have, he is able to follow the 80/20 rule. Yet, he still has a great love for Mocha Frappés--the ones that come from a certain fast food joint known for its golden arches. I wanted him to be able to indulge in the flavors of his favorite treat while maybe consuming *slightly less* of the non-paleo ingredients found in the commercial blended (flavored) iced coffee beverages. So, I set out to create a slightly better-for-you version that he could enjoy at home.

Paleo Mocha Frappe

Paleo Mocha Frappe
(left) Paleo frappé, (right) almost paleo frappé

In the end, I created not just one, but two frappé versions, both of which are still very much treats. The first is completely paleo, though it requires some prior planning to make the chocolate sauce, cold brew coffee & make coffee ice cubes, prep coconut cream.... I realize that not everyone may have the right forethought to prepare so many components ahead of time (basically, you would need to decide almost 36 hours ahead of time that you’d like to make a frappé), so I created a second, less labor intensive, version. The second version potentially uses some grey-area paleo ingredients but is more easily created on a whim. Still, with either frappé, the end product will have better, more “real” ingredients than a store bought treat.

Paleo Mocha Frappe

Paleo Mocha Frappé 
Yield: 1 serving

3 Super Cubes (approximately 150 g) of cold brewed coffee (see recipe below)
90 g (a little less than 1/2 c) Coconut Cream
60 g / 3 Tbl Paleo Fudge Sauce, plus additional for optional garnish
½ tsp Vanilla Extract
Coconut Whipped Cream (see recipe below), optional garnish

  1. Scale all the ingredients, in the order listed above, into a high-speed blender single-serve cup (I have this Ninja  but another brand should work too). 
  2. Screw on the blender cup top & blend until all the ice is pulverized. Allow the blender to rest as necessary. It may be beneficial to remove the blender cup from the base & shake it a couple times during the blending process. 
  3. Top with coconut whipped cream and/or a drizzle of paleo fudge sauce, if desired. Add a straw & serve immediately.
Note:
  • This frappé is not as sweet as the ones commercially sold. If desired, add 2 tsp (or more to taste) Coconut Sugar, or other Paleo sweetener of choice, during the blending process. 
  • This recipe can be easily doubled (or tripled) by using a regular blender container, instead of the single-serve cups. Scale ingredients directly into the larger vessel & blend.  
  • As always, use the weight measurements for the best accuracy. But this recipe isn't a fussy as a cake or other baked good, so if your amounts are slightly off, it should still be ok. 


Cold-Brewed French Press Coffee
8 Tbl Ground Coffee
32 fl oz Filtered Water 
  1. Measure the coffee grounds into the main vessel of a French press. Pour in the water. Stir to combine. 
  2. Place the lid on the French press, but keep the plunger up. Steep in the refrigerator for at least 8 hours and up to 12 hours.   
  3. After 8-12 hours, press the plunger to separate the coffee from the grounds.  Make coffee ice cubes, if desired. Store any leftover coffee in the refrigerator until ready to use. 

Coconut Whipped Cream
Yield: enough for 2 frappés 

1 can Coconut Milk, refrigerated at least 8 hours
1 tsp Grade B Maple Syrup 
  1. Refrigerate the can of coconut milk at least 8 hours. Open the can from the bottom & pour out the liquid. Save the liquid for a future use, such as in a smoothie. Scoop the solids into a medium sized mixing bowl.  
  2. Add the maple syrup & vanilla extract to the solids. Use a hand-held mixer (or the whisk attachment of an immersion blender) to whip the ingredients to soft peaks. Keep refrigerated until ready to serve. 
Notes:
  • Coconut milk with thickeners added (like guar gum) will produce the best textured whipped cream; however, thickeners can be gut irritants…. So keep that information in mind & make your own educated decision. 

Almost Paleo Mocha Frappé
Yield: 1 serving

125 g / ½ c + 2 Tbl Chocolate Coconut Milk Ice Cream 
      (Coconut Bliss brand is what was used for testing this recipe )
125 g / 4 fl oz / ½ c Cold Brewed Coffee (see above recipe) 
25 g / (a litle less than 2 Tbl) Coconut Cream
75 g / approximately 6 regular cubes Ice
2 tsp Coconut Sugar, plus more to taste, as needed
Coconut Whipped Cream, optional (see above recipe) 
Paleo Fudge Sauce, warmed, optional 
  1. Scale all the ingredients, in the order listed above, into high-speed blender single-serve cup (I have this Ninja  but another brand should work too). 
  2. Screw on the blender cup top & blend until all the ice is pulverized. 
  3. Top with coconut whipped cream and/or a drizzle of paleo fudge sauce, if desired. Add a straw & serve immediately. 
Notes:
  • Unless you make your own coconut milk ice cream, most commercial brands are not entirely paleo, due to added thickeners (like carrageenan, locust/carob bean gum, guar gum…) and/or sweeteners (like agave or cane sugar). 
  • I chose to use Coconut Bliss brand chocolate coconut milk ice cream because I have diagnosed sensitivities to locust/carob bean gum and carrageenan (discovered via blood tests), which are found in most other brands of coconut milk ice creams. Yes, coconut bliss contains agave (read more about agave here), but for me, agave is a "less bad" choice than choosing a brand with those thickeners.
  • This recipe can be easily doubled (or tripled) by using a regular blender container, instead of the single-serve cups. Scale ingredients directly into the larger vessel & blend.  
  • As always, use the weight measurements for the best accuracy. But this recipe isn't a fussy as a cake or other baked good, so if your amounts are slightly off, it should still be ok. 
This post contains affiliate links. Thanks for supporting Sweet Treats. 

Sweet Potato Paletas (AIP)


It’s been hot. Super hot. Like +110 F hot, and it’s only June..... While I wouldn’t discriminate against a frozen treat any time of the year, I especially crave them in the summer time. Since I cannot just run to any store or shop & purchase a frozen dessert that would fit within my unique dietary guidelines, I have to make my own. I have a feeling my ice cream bowl will be working overtime, if only I can find a way to clear enough freezer space to actually freeze it. But, I did manage to clear enough space for my popsicle mold, so that’s where I’m beginning this summer. 


Paletas were not something I’d heard of until I moved to the southern border of Texas--they’re the Mexican version of a popsicle, only not usually as sweet as their American counterpart. We’re able to get paletas in just about any local gas station or grocery store & they come in much more interesting flavors than the regular popsicles I was use to seeing. Coconut. Watermelon. Pineapple. Pecan. Rice Pudding. Pina Colada. Tamarind. Fruit flavors spiced with chile. (The rice pudding ones use to be my favorite....).


Sweet potatoes have become one of my staple foods--most often either baked or roasted. Since paletas already come in such interesting flavors, I thought that adding sweet potato variation to the mix wasn’t such a stretch :)


Traditional paletas aren’t super sugary & my sweet potato paletas follow suite--they get their limited sweetness from the sweet potato & the apple juice. Even with the limited sweetness, they are cold & very refreshing, especially on a hot day when you’re just dying for an ice cream.


If I wasn’t following a sugar-free diet, I’d add a couple tablespoons of honey or maple syrup. Or maybe some candied pecans. If you prefer a creamier pop, adding some yogurt (whether sweetened, or plain) would also work.


One final note: I made & styled/photographed these sweet potato paletas while watching Diane Cu & Todd Porter of “White on Rice Couple”  give a 3 day food styling & photography workshop on Creative Live. While the presentation isn’t free anymore (unless CL rebroadcasts it), I’d highly recommend checking it out if you’re interested in furthering your photography skills. I learned some fun new tips & was reminded of some things I should have been remembering anyway. 

behind-the-scenes image of shooting these paletas while watching Creative Live

Sweet Potato Paletas 
Yields approximately 12 pops, depending on mold size 

1 large sweet potato (mine weighed just under 1lb, pre-baking & around 12 oz after) 
4 Tbl Apple Juice
1 1/2 c (13.8 oz) Coconut Milk (beverage, not the culinary coconut milk from a can) 
2 tsp Cinnamon
1 tsp Vanilla
optional: sweetener of choice (especially if you’re not following a sugar free diet).... I’d use a couple tablespoons of honey or maple syrup, if it was allowed for me.  OR add a little vanilla coconut yogurt.  
  1.  Wash sweet potato & pierce the skin with a fork or sharp knife. Place sweet potato into an oven safe dish & roast at 350 F until fork-tender. (Mine took approximately 60 minutes in our toaster oven). 
  2. Once cooked, let the sweet potato cool completely (I put mine in the refrigerator overnight. 
  3. After the potato has cooled, remove the skin & add to a blender or food processor.  Add the apple juice, coconut milk, cinnamon & vanilla.  Process on high speed until well blended.  Add additional coconut milk if the mixture is too thick. 
  4. Pour into your popsicle molds, leaving some headspace at the top to allow for expansion during freezing.  
  5. Place in the freezer and freeze for 2 hours.  
  6. After 2 hours of freezing, insert the sticks. Continue to freeze for an additional 10-24 hours.  
  7. To unmold, fill a large bowl with warm water. Set the frozen mold into the warm water for 30 seconds & remove the mold. Gently lift the paletas out of the mold & place onto a parchment lined baking sheet. Top with a second layer of parchment & allow to freeze for 30 additional minutes. 
  8. After the additional freezing, the pops are ready to be consumed. If not eating right away, wrap them well & store in the freezer. 

For more information on paletas, this article is really helpful!


White Hot Cocoa Peppermint Affogato


Merry Christmas Eve! I accidentally left my camera on while we were out of town for a few days & I didn’t discover the dead battery until I was ready to shoot this post.  So, iPhone images it is :)


This year’s Christmas will be rather low-key, just my husband and myself. We’re looking forward to cooking Christmas brunch and Christmas dinner together while watching some festive movies and developing some of our own Christmas traditions. I am currently voting for the “stay in your pjs most of the day” tradition. :)


My family always has hot cocoa on Christmas Eve or Christmas day--it’s a tradition that stems from my maternal grandma’s childhood and involves a very special antique hot cocoa set.  I’m a little sad to miss out on the family hot cocoa session, so I’m planning to incorporate something similar into our Christmas Eve festivities. We’re going to have our hot cocoa affogato style instead.  


Affogato is an Italian-based dessert where a shot of hot espresso (or very strong coffee) is poured over a cold scoop of ice cream.  The heat melts the ice cream & espresso and ice cream become self-saucing. Sometimes liqueurs are also added.  Vanilla ice cream is most classic, but really any kind could be used.


For my version, I substituted a white hot chocolate for the espresso & candy cane ice cream for the vanilla ice cream.  Store bought ice cream works perfectly (which is a good thing because our freezer is so full that my ice cream maker bowl would never fit), but the white hot cocoa needs to be homemade. Luckily, it’s super simple.  Good quality white chocoalte is a must--always make sure the chocolate bar ingredients include cocoa butter & real vanilla.  I used a bar of Lindt chocolate I found in the candy bar aisle of the grocery store. I like to garnish with an extra sprinkle of crushed candy cane pieces & a little chopped white chocolate, but those are totally optional garnishes.


Serving the affogato with a crunchy festive cookie on the side completes the dessert (feel free to dunk away). Voila, an easy dessert that also fulfills the Christmas cocoa tradition.


I wish you all the merriest of holidays. I hope you are able to spend it with loved ones. And if you’re still stressing over an easy holiday dessert, consider the affogato.  It’s easily made for two or for 12.  And it’s gluten free!


White Hot Cocoa Peppermint Affogato 

2 c Milk (I used whole milk)
4 oz Good quality white chocolate (I used Lindt)
1 tsp Vanilla Extract
{optional} splash Vanilla Bean Paste 

Candy Cane Ice Cream (store bought is fine) 
crushed candy canes, for garnish
chopped white chocolate, for garnish

  1. In a small sauce pan, heat the milk to a simmer. 
  2. Chop the white chocolate into small pieces. Whisk into the simmering milk and continue stirring until all the chocolate is melted. Do not allow to boil. Remove from the heat and whisk in the vanilla(s). Pour the white hot cocoa into a vessel with a spout, such as a liquid measuring cup or a french press. 
  3. In a mug or bowl, add a couple scoops of candy cane ice cream. Pour the prepared white hot cocoa over the ice cream. Garnish with a sprinkle of crushed candy canes and white chocolate. Serve immediately.  
White Chocolate Mocha variation:

  • When simmering the milk for the hot cocoa, add a little instant espresso powder for a mocha kick.   
If you can’t find candy cane ice cream:

  • Substitute vanilla ice cream & make the white hot cocoa peppermint/candy cane flavored instead.  Add a few drops of peppermint extract (a little goes a long way) to the finished white hot cocoa.  Or, melt some candy cane pieces into the simmering milk before adding the white chocolate. 

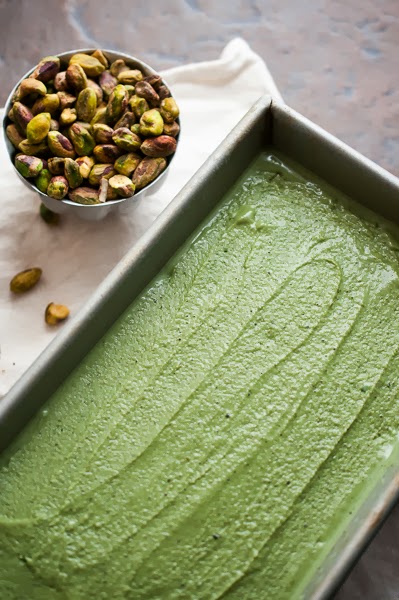
Pistachio Gelato & Gluten Free Ice Cream Cones


If there’s a flavor that reminds me the most of traveling abroad, that flavor would be pistachio. Specifically pistachio ice cream or pistachio gelato.  When I taste pistachio, I’m instantly transported back to the trips I’ve taken & the memories that were created.


I have fond memories of consuming many, many pistachio ice cream cones in both the Czech Republic and France. Though I can’t remember a specific pistachio experience in London, I’m sure there had to be one!


In deciding what was best to do with the remainder of my precious pistachio paste, ice cream or gelato seemed like the perfect thing. Though it’s nearly the end of September, the weather remains hot--definitely still ice cream weather for a long while yet.


My pistachio paste that I brought back from France is a bit more intense, both on the flavor side and the color side, than I expected. There’s no question by both the appearance & the taste that this ice cream is pistachio! I am rather picky about my pistachio ice cream.... I like it to taste like pistachio, but not actually have any pistachio pieces in it. Generally, I’m not a huge fan of any nuts in my ice cream.


Ice cream out of a dish is great, but there’s something a little extra special about cones. Since I can’t find gluten free cones here, the best course of action was to make them myself.  I don’t have a waffle cone iron or a pizzelle iron, but I do have my beloved krumkake iron that unfortunately only usually gets put to good use during the Christmas season. It worked as a perfect stand in.


While esthetically the cones could use a little work (it was difficult to get the closed point at the bottom due to how extremely hot they were!), they tasted perfect. The slight nutty flavor from the almond flour and coconut oil complimented the intense pistachio flavor quite nicely.  You could absolutely not tell that they were gluten free!


With every mini-cone that I’ve consumed, the travel bug continues to bite & I look forward to future travels & adventures abroad. Hopefully they, too, will have some sort of pistachio ice cream cone.


Pistachio Gelato
Inspired by David Lebovitz

Classic gelato is made using whole milk (no cream) and a good amount of egg yolks; however, this version, inspired by a David Lebovitz recipe, has milk but no yolks. He writes that not including the yolks is not only mimics the classic Sicilian style but also allows the pistachio flavor to better shine through. I found, however, that my particular pistachio paste was particularly strong in flavor. I added the addition of cream cheese to try to soften the pistachio paste flavor just slightly.

32 g (4 Tbl) Cornstarch
4 cups whole milk, divided
65+65 g (2/3 c) sugar 

1.5 oz Cream Cheese, slightly softened

1/8 tsp Almond Extract
7  oz (200 g g) Pistachio Paste
a couple drops of lemon juice 

1 Tbl Vodka (optional) 

  1.  In a small bowl, make a slurry with the cornstarch & approximately half a cup of milk.  Mix until the starch is well dissolved & there are no lumps. I use my clean fingers for this particular job. 
  2. Pour the remaining milk into a sauce pan & sprinkle the sugar over the top. Heat over medium high heat, not stirring at all. Once the mixture almost begins to boil, whisk in the cornstarch mixture. Cook at a simmer, stirring constantly, for 3 minutes. Remove from the heat. 
  3. Place the cream cheese in a medium sized bowl.  Add a little of the hot dairy to the cream cheese & whisk until smooth. Add a little more dairy & whisk again.  Then, pour the cheese mixture back into the dairy.  Cool slightly 
  4. Add the almond extract and pistachio paste. Whisk until completely smooth.  Transfer to a clean bowl & chill over an ice bath until cool.  Cover the bowl & refrigerate until very cold, preferably overnight.  
  5. Just before processing in the ice cream machine, whisk in the vodka, if using.  The alcohol will keep the gelato from freezing rock solid.  Churn the ice cream according to your ice cream machine’s instructions. 
  6. Place the finished ice cream into a container with a lid & freeze a couple of hours before serving. 


Ice Cream Cones
Inspired by The Advanced Professional Pastry Chef
yield’s approximately 14 small cones 

1 oz (2 Tbl) Butter, melted
1 oz (2 Tbl) Coconut Oil, melted
2 oz Confectioners Sugar, sifted

2 oz (1/4 c, approx 2 large)  Egg White
1/2 tsp Vanilla Extract
pinch salt

2 oz Almond Flour 
2 oz GF AP flour

  1. In a medium sized mixing bowl, whisk together the melted butter & coconut oil. 
  2. Sift the confectioners sugar over the butter & oil while continuing to whisk. 
  3. Drizzle in the egg white & mix well.  Add the vanilla and salt. 
  4. Pour in the almond flour. Whisk until smooth. 
  5. Add the GF flour & whisk until everything is homogenized.
  6. Refrigerate the batter for at least 30 minutes. 
  7. Preheat the iron. A Pizzelle Bakeror Cone Maker is ideal, but I used a krumkake iron because it was what I have.  
  8. Drop the batter by the tablespoon-ful (I used a small cookie scoop) onto the hot iron. Close the top & cook until golden.  
  9. Immediately remove from the iron & wrap around a cone form. Be careful not to burn your fingers! Wear gloves if the hot cookie burns your fingers too much. Try to make the bottom of the cone into the best point possible. Allow to cool for a minute in the cone form, then transfer the a rack to continue cooling. 
  10. Repeat the process with the remaining batter, making as many cones as needed right then.  
  11. Batter will keep for 1 week in the refrigerator. Baked cones are very susceptible to moisture & must be stored in an airtight container once they are cool. It is best to make the cones only as needed rather than trying to store already made cones. 

Note: this post contains affiliate links. 


Roasted Peach Snickerdoodle Ice Cream Sandwiches


Greetings from Chicago! I’m at the tail end of a trip back north to visit family.  I intended to post several times during this time away.  I made things--photographed them even--but I seem to balk when it comes to the actual writing and posting.  So I’m going to keep this one shorter on the writing!


Snickerdoodle cookies are one of my absolute favorite cookies, if one can really pick a favorite cookie.  I have very fond memories of making them with my mom and sisters as a young child--snickerdoodles also happen to be one of my dad’s favorites, so I’m fairly sure we made them for him on many occasions.


This particular snickerdoodle recipe is a bit different than the traditional one I made in my childhood.  The cookies turn out a bit flatter and crispier, which I think is perfect for turning into ice cream sandwiches.  I made both a gluten free version, using my favorite Gluten Free Flour Mix, and a regular version using all purpose flour. There was virtually no difference between the two! In fact, I almost had to make a second batch of Gluten Free cookies because I couldn’t stop eating them!


I’ve been hearing about Jeni’s Splendid Ice Creams for a couple of years now, but it was only this past spring in Birmingham that I had the opportunity to try a flavor.  The texture (not to mention the flavor) is absolutely phenomenal, and I knew I needed to try one of her recipes at home.  I unfortunately do not have access to buying any of Jeni’s flavors near where I live.  I roasted some white peaches & yellow nectarines, pureed them and mixed them into the plain ice cream base.


One tip if you plan to make ice cream sandwiches out of homemade ice cream: spread the freshly churned ice cream onto a plastic-wrap lined baking pan.  Cover the pan completely with plastic wrap & freeze for a couple of hours.  The ice cream can then be cut to size with a circle cutter, placed directly onto the bottom of the first cookie, and topped with the second cookie.  So much easier than scooping!


Snickerdoodle Ice Cream Sandwiches with Roasted Peach Ice Cream

Roasted Peaches
16 oz pitted   peaches & nectarine combo (I used 2 nectarines & 2.5 white peaches; weight after they had been pitted) 
1/3 c Sugar

  1. Preheat the oven to 375 F.  
  2. Cut peaches in half, remove pits.  Place into an ovensafe baking dish.  Sprinkle with the sugar. 
  3. Roast until soft, approximately TIME
  4. Cool completely, then peel.  
  5. Process the roasted, peeled peaches in a food processor until completely pureed. Pour into an airtight container & refrigerate until cold.  

Ice Cream Base 
Adapted from Jeni’s Splendid Ice Cream via Saveur 

63g / 1/4 c Milk
11 g/ 4 tsp cornstarch

420 g/ 1 3/4 c Milk
290 g/ 1 1/4 c Heavy Cream
4.7 oz / 2/3 c Sugar
43 g / 2 Tbl Light Corn Syrup
1/4 tsp Salt

1.55 oz/3 Tbl Cream Cheese, softened 
1/4 tsp Cinnamon

  1.  In a small bowl, stir together the first measure of milk and cornstarch to make a slurry.  Mix it enough that there are no cornstarch lumps. Set aside. 
  2. In a 4 quart sauce pan, whisk together the milk, cream, sugar, corn syrup & salt.  Heat over medium high heat, stirring constantly for 4 minutes.  Remove from the heat. Whisk in the cornstarch slurry. Return the pot to medium high heat & continue whisking for an additional 4 minutes. Remove from the heat. 
  3. Place the softened cream cheese into a medium sized bowl. Whisk a little of the hot dairy into the cream cheese. Mix until there are no lumps. Gradually add the remaining dairy.  Whisk in the cinnamon. 
  4. Chill the ice cream base over an ice bath until cold.  Stir occasionally during the cooling process. 
  5. Once cold, add the pureed roasted peach/nectarine mixture.  Whisk to combine. 
  6. Churn the base in an ice cream maker according to the ice cream maker’s manufacturers instructions.  
  7. While the ice cream is churning, prepare a quarter sized sheet pan (or flat toaster oven pan) by lining it with plastic wrap.  Leave enough overhang to completely cover the pan.  Once the ice cream has finished churning, spread it evenly throughout the pan.  Smooth the top as much as possible.  Use the overhang of plastic wrap to completely encase the ice cream.  Smooth out any air bubbles (or you risk developing frost/freezer burn in those pockets. Place the covered pan in the coldest part of the freezer. Freeze a minimum of 4 hours, though overnight is preferred.  

notes: 

  • This recipe can be made in a 3qt sauce pan, but it comes dangerously close to boiling over.  I suggest using the larger size pot, but if you don’t have one, just be extremely extremely careful during the cooking process.
  • The original recipe called for chilling the ice cream base in a large ziplock bag, then cutting the corner of the bag to transfer the base into the ice cream maker.  I tried their recommended method the first time, but unfortunately the bag broke & spilled everywhere.  Such a mess! So, I prefer to just set a smaller bowl with the base inside a bowl of ice.  
  • I spread the finished ice cream onto a lined baking pan to make the assembly of the ice cream sandwiches easier.  If you just plan to make the ice cream for scooping, not making into ice cream sandwiches, portion it into airtight containers--I find heavy duty plastic containers help prolong the life of the ice cream. 

Snickerdoodles
4 oz Unsalted Butter, softened
4.5 oz Granulated Sugar
1 egg
1 tsp Vanilla Extract
6.25 oz Gluten Free Flour (I used my favorite blend, or you can substitute AP flour if you aren’t GF)
1/2 tsp Baking Soda
pinch Sea Salt

2 oz (heaping 1/4 c) Sugar
2 tsp Cinnamon

  1.  Preheat oven to 350. Line two baking sheets with parchment paper. 
  2. In the bowl of a stand mixer fitted with the paddle attachment, cream together the butter and sugar on medium speed until the mixture has fully combined, has lightened in color, and increased in volume, at least 2 minutes. Scrape down the sides of the bowl. 
  3. Add the egg and vanilla. Beat until combined. Scrape down the sides of the bowl.  
  4. In a separate bowl, whisk together the flour, soda, and salt.  
  5. Add the dry ingredients to the creamed mixture and mix just until combined.  
  6. In a separate bowl, mix together the sugar and cinnamon
  7. Use a small cookie scoop to make equal portions of dough.  Roll each dough piece in the cinnamon sugar.  
  8. Place the rounds onto the prepared baking sheet. Flatten slightly with the heel of your hand or the flat bottom of a drinking glass. 
  9. Bake in the preheated oven for approximately 10 minutes (if baking more than one sheet at a time, bake for 6 minutes, then rotate the pans and bake for an additional 4 minutes).  Let the cookies stand for  3 minutes on the baking sheet before moving them to a wire rack to cool completely. 
  10. Store in an airtight container until ready to assemble the ice cream sandwiches. 


Ice Cream Sandwich Assembly

  1.  Remove the ice cream from the freezer 5 minutes before you plan to assemble the sandwiches & allow to stand until slightly softened. 
  2. Use a large circle cutter to cut circles out of the sheet of ice cream.  
  3. Place each circle onto the bottom of one cookie & top with a second cookie. 
  4. Wrap each sandwich individually in plastic wrap.  Store in the freezer until ready to eat.