Showing posts with label Crust. Show all posts

Berry Panna Cotta Pie (AIP & Paleo)

Berry Panna Cotta Pie (AIP & Paleo)

Last weekend, we celebrated Independence Day (aka the 4th of July) in the US. The holiday sort of sneaked up on me, after a busier-than-average June, so I did not have time to concoct a new AIP patriotic dessert this year. I planned to make the patriotic panna cotta I posted last year (actually, it’s one of my most favorite, easiest AIP desserts because you really can substitute almost any fruit you like). At the last minute, I had an epiphany to make the panna cotta into a pie by first making an AIP pie crust (I used a recipe from my friend Martine at The Paleo Partridge), then filling the baked/cooled shell with berries & adding the panna cotta custard liquid. 

Berry Panna Cotta Pie (AIP & Paleo)

The results were spectacular! The pie tasted very reminiscent of the fruit tarts I use to make in my pre-AIP/paleo days & are something that I really miss.  I remarked to my husband, as we sampled the pie, that it tasted so “normal.” Martine’s crust was almost like a short bread cookie, very similar to the pate sucree I use to make for all my tarts. The creamy coconut filling wasn’t overwhelmingly coconut-y & pared so well with ripe berries & the almost buttery crust. I had to pinch myself that the dessert was completely AIP!!

Berry Panna Cotta Pie (AIP & Paleo)

Though I hadn’t intended to do a blog post on this pie, the reactions to the image I posted on Instagram were so great that I thought a post would be nice to make the recipe easier to find (and let’s be honest, more pin-able, since I can’t keep track of recipes very well unless I can pin them to Pinterest). I believe this crust/fruit/panna cotta custard combination would work well with fruits other than berries (peaches, plums, nectarines, cherries, apples, pears, figs... etc) when berries are no longer in season. If you try another fruit variation, please post a picture on Instagram & tag me (@lauravein) in it!

Berry Panna Cotta Pie 
yields 8 servings, or one 9 inch pie  

250 g (approximately 2 cups) berries or other fruit of choice (I used strawberries, blueberries, blackberries & raspberries)
1 recipe of Panna Cotta custard 
  1. Make the sweet & savory pie crust according to the directions on Martine’s web site. The only changes I made were to skip piercing the bottom of the crust before baking (I didn’t want the filling to run out later) & to bake it 5 minutes longer because I didn’t want to risk the crust getting soggy from the filling. 
  2. While the pie shell is cooling, prepare the berries, cutting them if desired. Place the fruit into the bottom of the cooled shell. 
  3. Make the panna cotta custard according to the directions--Omit the vanilla for elimination phase AIP. Set the berry-filled pie shell onto a sheet pan for easier transport, then carefully pour the custard over the fruit. 
  4. Allow the pie to chill until the custard is set, approximately 2 hours. Let the pie sit at room temperature at least 10 minutes before serving. Refrigerate any leftovers, covered, in the refrigerator. The pie is best consumed within 24-36 hours, or else the crust begins to get soggy.

Pumpkin Panna Cotta Tart with Gingersnap Macaroon Crust (AIP)


Pumpkin pie, specifically my great grandma’s recipe, is the most quintessential Thanksgiving food in my opinion. But creating an AIP version of her pumpkin pie has been a bigger challenge than I anticipated (and has involved multiple failed attempts). Once I combined Great Grandma’s pumpkin pie flavor profile with her gingersnap cookie flavor profile, I finally came close to something that tasted like the “normal” holidays.


This holiday season is my first time navigating major holidays while following the Autoimmune Protocol.  I’m very much into tradition, especially when it comes to holidays & holiday foods. Coming to terms with the realization that not every dish I try to recreate AIP-style will taste (or look) exactly like it’s original can be really a challenge.


Also, can I just say that grain free, dairy free, refined sugar free, egg free, nut free baking is really hard? I’m still very much learning how new-to-me ingredients act during the scientific processes involved in baking. My multiple attempts at a traditional pie crust  turned AIP were unsuccessful, but repurposing my AIP Coconut Macaroon recipe into a crust worked really well. And to make it taste a bit more holiday-esque, I substituted a bit of the honey for molasses & added some ground ginger. Trying to create a custard-like pudding without the aid of eggs steered me towards the panna cotta side of things. Both the crust and the filling could be made & enjoyed separately, but I really enjoy them together. It might not taste exactly like “normal” pumpkin pie, but it’s still a flavorful treat that won’t derail healing processes.


Speaking of the holiday season, a group of AIP bloggers have put together a free holiday guide full of AIP-friendly holiday recipes. And Phoenix Helix has a great podcast about surviving the holiday season. If you need some inspiration, check those out. Have a wonderful Thanksgiving!


Pumpkin Panna Cotta Tart with Gingersnap Macaroon Crust
Yields 8 servings

Gingersnap Macaroon Crust 
120 g (1 1/2 c) Shredded, Unsweetened Coconut
7 g (1 Tbl) Coconut Flour
1 tsp Ground Ginger
Pinch of Sea Salt
26 g (2 Tbl) Coconut Oil, melted
65 g (3 Tbl) Honey (local or organic is best)
21 g (1 Tbl) Unsulphured Molasses
  1. Preheat the oven to 350 F.
  2. Pulse the shredded coconut, coconut flour, ground ginger and sea salt in a food processor until combined.
  3. Add the oil, honey and molasses & pulse until well mixed.
  4. Press the mixture into a 4" x 14" Rectangular Tart Pan
  5. Bake for 10 minutes in the preheated oven. Rotate the pan & bake for 10 additional minutes, or until the tart crust has turned a bit more golden, but is not scorched. 
  6. Cool completely. Remove the tart pan & place the crust onto a baking sheet. Proceed with the panna cotta filling.

Pumpkin Panna Cotta Filling 
4 g (approximately 1 tsp) Grassfed Gelatin
123 g (1/2 c) Organic Pumpkin
20 g (3 Tbl) Grade B Maple Syrup
2 tsp Vanilla Extract (optional for AIP)
Coconut Whipped Cream, for serving 
  1. Place the coconut milk into a small sauce pan. Sprinkle the gelatin over the coconut milk & mix gently--I usually use my fingers & break up any clumps that I can.  Set aside & allow the gelatin to bloom for 10 minutes. 
  2. Add the remaining ingredients. Heat over medium heat for five minutes, whisking constantly. 
  3. Pour into the prepared crust (note, you may not need all the filling; place any leftovers into a small ramekin-type vessel). Refrigerate at least 3 hours before serving. The tart may be made a day in advance.
  4. Cut the tart into diagonal slices. Serve with coconut whipped cream. 

This post contains affiliate links. Thanks for supporting Sweet Treats. 

Stovetop Peach Blueberry Crisp (Paleo & Vegan)


“...the girls put their wits to work, 
and necessity being the mother of invention, 
made whatever they needed.” 
-Louisa May Alcott, Little Women. 

Since we don’t have a working oven at my family’s lake cabin in Minnesota, I had to be a little creative when it came to planning meals & treats. We made use of the stove top, outside grill, microwave & slow cooker for the main dishes & vegetables, but dessert was a little more challenging, especially considering my Autoimmune Protocol (AIP) dietary parameters.


There’s something about being around water all day that makes a person extra hungry. And, of course, the “I’m-on-vacation-and-am-allowed-to-splurge-a-little” thinking. In past years, splurging would have meant driving to the nearby gas station for half a gallon of ice cream & a can of Hershey’s syrup, or making s’mores around a beach fire, or eating packages of cookies. But thankfully, my family has been oh so understanding about what I can and cannot eat & they were on board with some AIP & Paleo splurges instead of our normal treats. We brought along some Coconut Milk Ice Cream , and I also made coconut milk panna cotta (with nectarines instead of berries).


Then one day, when the weather was grey, windy & rainy, I wanted to create a dessert that leaned more towards warmth and comfort than to cold & refreshing. We had some peaches that were nearly over-ripe & a bag of frozen blueberries that were originally slated for making smoothies. Almost immediately, the thought of a crisp/crumble came to mind….

But how do you make a crisp without the oven? Easy. First, toast the topping in a skillet, then, once the topping is done & moved to a bowl, cook the fruit on the stovetop. Spoon the cooked fruit into bowls & top with the previously made crumble. Voila, fruit crisp, sans oven :)


I’ve previously made gluten free crisps & crumbles (like this one and this one), but grain free baking is still a new territory to me. I’m still cautious about working with different ingredients, like liquid sweeteners (i.e honey & maple syrup), arrowroot starch, coconut flour, and even coconut oil, but I am attempting to be more brave in my experimentation. It looks like I’ll probably be following some version of Paleo for the rest of my life, so I might as well get use to it :) Fortunately, crisps and crumbles are a bit more forgiving & don’t require quite as much scientific precision as say a cake or cookie needs. 


Since I am in the reintroduction phase of the Autoimmune Protocol & almonds seem to be ok (just in not giant quantities), I used a mixture of coconut flour & almond flour in the topping, but if you’re not yet to reintroducing almonds, using more coconut flour would also work. As I toasted the topping on the stove, several family members could smell its fragrance & came over to see what I was concocting--that’s always a good sign.


When we were ready to eat dessert, I spooned the thickened fruit into bowls & let each person top their own dish with as much crumble as he or she wanted. I’m usually a fan of ice cream on my crisp (or whipped cream), but this time, I splashed a little coconut milk to mimic the creaminess. We were all satisfied by how delicious it was & no one felt deprived by this “healthier” dessert. I’ll be remembering this stovetop method in the future for times when it simply is too hot to turn on the oven :)


Stovetop Peach Blueberry Crisp
serves 4 

42g / 5 Tbl Coconut Flour
56 g / 1/2 c Almond Flour (AIP Modification: omit almond flour & increase coconut flour instead)
1/4 tsp Sea Salt
1 tsp Ground Cinnamon
42 g / 3 Tbl Coconut oil, melted
1.5 oz / 2 Tbl Honey

300 g / 1.5 c Frozen Blueberries (may substitute fresh, but add a little water too)
2 medium-large peaches (around 400g), cut into thin slices, peeling is optional
2.75 oz / 4 Tbl Pure Maple Syrup 
1 Tbl Lemon Juice

Coconut Milk, for serving 
  1. To make the crumble topping: combine the coconut flour, almond flour, sea salt, and cinnamon in a small bowl.  Drizzle in the coconut oil & honey.  Mix with a fork until crumbly. 
  2. Toast the crumble in a large skillet over medium high heat, stirring constantly, for a couple of minutes, or until the crumble begins to brown slightly & smell toasty. Remove from the skillet & set aside. Give the skillet a quick rinse. 
  3. To make the filling: add the blueberries and peaches to the skillet. Drizzle with maple syrup and lemon juice  Cook over medium heat until the juices begin to boil. Cover the skillet, reduce the heat to a simmer & cook until the peaches are tender--approximately 10 minutes. Stir occasionally, as needed. Taste & add additional maple syrup if the filling isn’t sweet enough. 
  4. Remove 1/2 c of liquid from the pan & place into a small bowl. Into the liquid, stir in the arrowroot, making sure there are no lumps. Add the mixture back to the skillet and cook for an additional minute to allow the fruit to thicken & to cook out any starch flavor from the arrowroot. Remove from the heat. 
  5. Just before serving, spoon the fruit into bowls & sprinkle with the crumble topping (note: there may be leftover crumble topping). Top with a splash of coconut milk or a scoop of coconut milk ice cream. 
  6. Store any leftover fruit filling in the refrigerator. Keep any leftover crumble topping tightly covered at room temperature. 

This post contains affiliate links. 

Pecan Pie (GF)


Sometimes, we do not fully realize a person’s influence on us until they are no longer with us. Case in point, my friend Chef John Michael Lerma, who sadly, at the age of 52, passed away earlier this month.


John Michael, or JML as he is often referred to, was a native of my home state of North Dakota & also attended my alma mater, the University of North Dakota, though in the past years, he resided in the Twin Cities area of Minnesota.  In addition to being a noted food writer, cookbook author, and competitor in culinary competitions, he also taught in various demonstration kitchens, was a representative for Emile Henry bakeware, and he lead culinary vacations (!!) to both Italy & Mexico.


While I was working at the University of North Dakota Wellness Center, both in the marketing department and as an instructor for the Culinary Corner Demo Kitchen, John Michael did several guest demonstrations. He also cooked for us demo kitchen employees a few times & just talked to us about life and experiences.  He had such a big heart & truly loved food (and people). I was so saddened to hear of his passing.


When I met John Michael, I was in an interesting place in life... I knew I would be moving to South Carolina the following year to fulfill my dream of attending culinary school, but I didn’t really know what life would bring beyond that. Having also earned an art degree in graphic design/photography and also having worked in a marketing department, I really appreciated an atmosphere of collaboration & helping your fellow artists become the best they could be. But it seemed to me as though kitchens were often more competitive than collaborative. John Michael really embodied the spirit of collaboration I found was lacking in many kitchens. It was easy to tell from conversations with him one-on-one and from seeing him teach a room full of eager pie fans how excited he was about sharing his knowledge with others. He genuinely cared about his audience & wanted them to be as successful as possible in their kitchen endeavors. He was genuine, not at all afraid to reveal his own tricks & tips.


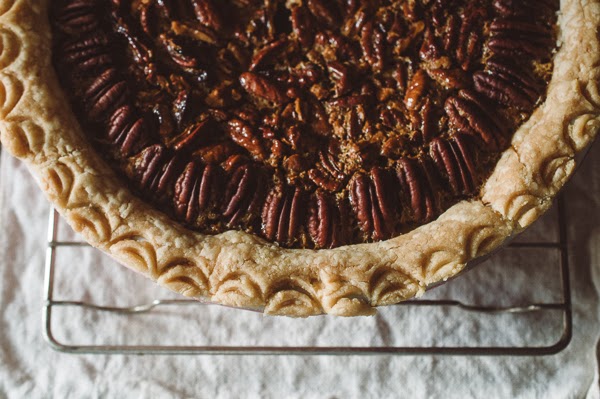
John Michael was famous for many food items (I still love to make his pizza dough & this amazing creamed mushroom dish I saw him demo once), but pies were one of his specialties.  He won seven (!) national pie competitions & his second cookbook is entirely pie themed.  I thought the best tribute to him was to make a pie in his memory. And to make that pie in the pink Emile Henry pie dish he graciously gave to me (and autographed) on one of his visits.  With Thanksgiving around the corner, making his pecan pie recipe, adapted to be gluten free, seemed the most appropriate.


In preparation to make this pie & write this post, I reflected on my experiences with John Michael Lerma. I like to think that perhaps his genuine, caring manner has influenced my own style, both when I was teaching in a culinary classroom, and now as I “teach” through blogging. I hope that I can portray even a fraction of his passion for food & for others. I will also forever remember him as the person who introduced me to the wonderful world of Vanilla Bean Paste(which truly is one of my favorite baking ingredients).


John Michael, you will be missed!  But your legacy will live on in your cookbooks & in the many lives you touched!

Pecan Pie (GF) 
adapted from Garden County Pie
yields 8 servings 

1 recipe GF Pate Brisee 
tapioca starch for dusting 

FILLING
4 large eggs, room temperature, well beaten
5.25 oz / 3/4 c Granulated Sugar
2.65 / 1/3 c melted unsalted butter
3.65 oz / 1/3 c pure maple syrup (NOT pancake syrup)
5.5 oz / 1/2 c light corn syrup
5.5 oz / 1/2 c dark corn syrup )i only had 4 oz, so i added an additional 1.5 oz of light) 
2 tsp vanilla bean paste
1 tsp Bourbon (optional) 
1/4 tsp sea salt
1 1/2 c pecans, broken, plus additional for decorating the top of the pie (for me it was 3.9 oz +2 oz inside) 

Whipped Cream for serving, optional 
  1. Make the pie dough & allow it to rest in the refrigerator at least 2 hours (overnight is even better. 
  2. When ready to assemble the pie, remove the dough from the refrigerator & place it on a surface that has been well dusted with tapioca starch. Dust the top of the dough & the rolling pin with additional tapioca starch.  
  3. Quickly roll out the dough, keeping it as circular as possible, until it is a little larger than a 9” pie pan.  Move the dough around on the counter/board to make sure it isn’t sticking.  
  4. Gently fold the dough in half & place it into the center of the pie pan.  Unfold the dough & press it lightly with your finger tips & knuckles until it is formed to the pan.  Use a knife or kitchen sheers to cut off any excess.  Place the pan into the refrigerator while the rest of the filling is made.
  5. Preheat the oven to 375 F. 
  6. In a large bowl, whisk together the eggs, granulated sugar, melted butter, pure maple syrup, corn syrups, vanilla bean paste, bourbon and sea salt. Add the pecans & stir to combine.
  7. Remove the prepared crust from the refrigerator & set on top of a rimmed sheet pan. Optional, use the edges of a spoon to make the scalloped pattern by gently rolling the tip of the spoon (I used an ice tea spoon) over the edge of the dough. Add a divot inside each scallop.  
  8. Pour the prepared filling into the crust.  Place additional pecan halves around the edge of the pie, if desired.
  9. Bake for 20 minutes at 375 F, then reduce the oven to 350 and bake for an additional 40 to 50 minutes.  Check the pie often in the end stages & cover the edges of the pie with foil if they become too dark.  When the pie is done, the edges should be set & the center will be just a little wobbly.
  10. Remove the pie from the oven & allow to cool completely. Refrigerate, if possible, a couple hours before serving--this will make cutting the pie easier. 
  11. Cut into pieces & serve with whipped cream, if desired. The crust will be very crumbly, but delicious. Leftovers can be stored room temperature in a covered container, but the pie is easier to cut and serve when refrigerated. 
This post contains affiliate links. 

Peach Surprise with Grandma Vein


“What’s the surprise?” asked my husband when I told him about my plans to make “Peach Surprise” with my Grandma Vein while we were back in North Dakota.  “I really don’t know.” I told him. And that’s the truth! I just know “peach surprise” is one of my absolute favorite summer-time desserts. 


After very suddenly losing my other grandma last year and since my sisters and I all live in different parts of the US, my motivation during trips back to North Dakota changed.  My number one focus has become spending as much time with family as possible. Grandparents are not alive forever. (really none of us are.) And we never know which visit will be our last.


Last month, we took a trip back to North Dakota/Minnesota to visit my family. We were fortunate to spend a few days in my hometown, followed by a few days at my family’s lake cabin in Minnesota.


My husband had to go back to work in Texas, but I stayed longer to spend some additional time in my hometown & to help my youngest sister move to Chicago.


One of the things I most wanted to do while in ND was to make something with my Grandma Vein. She’s a fabulous baker and cook! Last summer, we made a peach pie together, but this summer, I knew we needed to make “peach surprise.”


The recipe for “peach surprise” is straight out of an old lutheran church cookbook.  The pages where the good recipes are located are stained from years of use. Grandma has written her own notes & variations throughout the cookbook too.


Grandma’s favorite peaches are the elberta variety.  Every year, she patiently waits for them & buys them in mass quantities.  Grandma told me this year that she even called the store to reserve a whole lug of them (i.e. a little less than a bushel), fearing the store may run out before she could get any.


All those peaches get turned into delicious peach desserts, or sliced & eaten on their own with perhaps a splash of heavy cream.  Grandma also gives many of the peaches away to her sons so that their families may enjoy eating them.


One of the great things about “peach surprise” is that it is a no-bake dessert--just a graham cracker crust with peaches & a marshmallow/whipped cream filling.  But, since I can’t eat regular store bought graham crackers, we did have to turn on the oven to bake a batch of gluten free graham crackers first.


Grandma had suggested maybe we should make a gluten free cereal-based crust, using something like rice krispies, but I convinced her that gluten free graham crackers are rather fast and easy to make yourself. Honestly, I also just could not bear to change a classic too much!


While the gluten free graham crackers baked and later while the dessert was chilling in the refrigerator, Grandma and I had some good visiting time. She showed me all her latest photo albums & told me all the family news I’ve been missing. She has a hard time hearing voices over the phone, so our phone chats have been a bit difficult lately.  It was lovely to actually talk in person.


Though peach surprise is an easy dessert to make, I feel so fortunate and blessed to actually make it with Grandma. There are so many things she makes that my whole family loves to eat, but most of us don’t have those precious “memory food” recipes.


Even with my culinary school education, I treasure the times Grandma and I spend in the kitchen where she teaches me her tricks & techniques for making things.  I am actively trying to make sure that I document as many of her recipes, including the methods she uses that aren’t written in the recipes.


When I returned to Texas and told my husband and friends about my experiences making “peach surprise” with Grandma, they requested to try the dessert for themselves.  So for our Labor Day cookout yesterday, I made a pan of "peach surprise". It was the perfect way to celebrate the end of summer and a sweet finale to the evening.


Peach Surprise
yields approximately 12 servings

6 oz / 170 g / 4 cups Mini Marshmallows
4.95 oz / 139 g / 1/2 c Orange Juice

10 oz / 280 g /2 c Graham Cracker Crumbs {I used Gluten Free} 
2.45 oz / 69 g / 1/3 c Confectioner’s Sugar
4 oz / 112 g / 1 stick Unsalted Butter, melted

5 large ripe peaches {Grandma would suggest Elberta peaches}
16 oz / 448 g / 1 pint heavy cream

  1.  In a double boiler, melt the marshmallows with the orange juice. Stir often. Remove from the heat to cool while the crust is made. 
  2. To make the crust: crush the graham crackers (if they aren’t crushed already) using either a food processor or a ziptop bag with a rolling pin.  In a medium sized bowl, combine the crumbs with the confectioners sugar.  Add the melted butter and mix until all the crumbs are moistened by the butter. Press the mixture into the bottom of a 9x13” pan. Chill in the refrigerator while the filling is made.  
  3. To make the filling: Peel, and slice (and chop, if you like) 5 large peaches. Whip the cream to medium stiff peaks either by hand, or on high speed with a hand mixer, or on high speed in a stand mixer fitted with the whip attachment. Once the cream is whipped, fold it together with the previously made & slightly cooled marshmallow/orange juice mixture. Fold in the peaches.  
  4. To assemble: Spoon dollops of the filling over the prepared crust.  Smooth out the top surface of the filling. Cover the pan & refrigerate for 4 hours. 
  5. When ready to serve, cut the dessert into 12 pieces.  The dessert will keep for several days well covered in the refrigerator (if it isn’t entirely eaten immediately).